An obscure and rarely mentioned audio plugin by Waves exists that is well suited for Spoken Word processing, Live Streaming, and Podcast Post Production – MaxxVolume.

Back in 2012 I documented my initial interest and subsequent purchase of MaxxVolume. I paid $149 for the plugin, on sale at the time over at DontCrack. I believe the original selling price was $400. It’s currently available for $49.
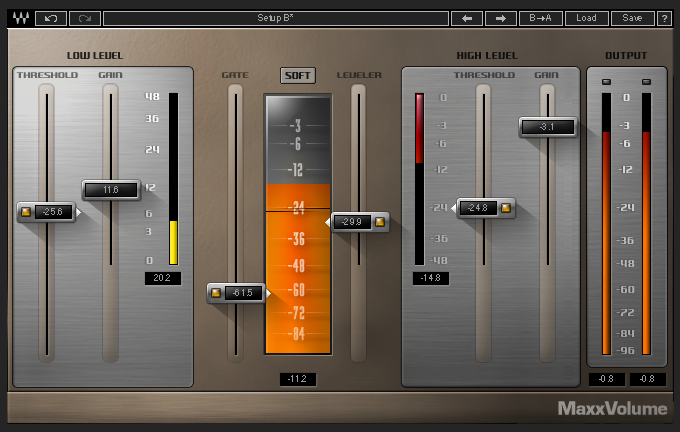
MaxxVolume is a multi-stage dynamics processor. The plugin features High/Low Level Compressor modules, a Downward Expander, a Leveler stage (aka RMS compressor/AGC), a user selectable Loud/Soft ARC flag, and a global Output Gain control.
Let’s explore the attributes of MaxxVolume …
Leveler
The Leveler fader value defines the AGC threshold and target. The inherent processing uses long attack and release times similar in attributes to an RMS compressor to effectively maintain consistent levels over time. Basically, automatic gain-riding initializes when the passing signal level exceeds the threshold and correlated target.
The Energy Meter’s internal chain placement is located after the Leveler processing and before the plugin’s remaining dynamics modules.
Gate
The included Gate is essentially a Downward Expander. When the passing signal level drops below the defined Threshold fader setting – attenuation is initialized. Note the general difference between a Gate and Downward Expander: a Gate applies a sort of hard mute. A Downward Expander applies a much more gradual transition between audibility and attenuation.
High Level Compressor
A traditional compressor applies gain reduction (dynamic range compression) when signal levels exceeds a defined threshold. In general the operator may (1) elect to work with the compressed/attenuated audio, or (2) apply makeup gain to compensate for the resulting attenuation.
The MaxxVolume High Level Compressor is controlled by a single Threshold fader. Gain reduction is indicated on the associated meter when the signal level exceeds the defined threshold. Automatic makeup gain is applied to compensate for active gain attenuation.
The Gain fader located in this module controls the maximum output signal level. This setting is NOT a ceiling based compliance limiter!
Low Level Compressor
This module basically applies upward soft-knee compression. It allows the operator to add a specific amount of gain to the passing audio when it’s level drops below the user defined threshold. The associated Gain Meter indicates the amount of makeup gain.
Note: The High and Low Level Compressor threshold settings are displayed within the previously mentioned Energy Meter.
The Soft/Loud Flag
This flag sets the attributes for the Waves proprietary ARC (Auto Release Control).
ARC, as described by Waves:
“The ARC algorithm is designed to dynamically choose the optimum release value for a wide-ranging input. ARC reacts much like a human ear, and can produce significantly increased RMS (average) levels with excellent audio clarity.”
In essence – the Loud setting uses shorter Release times resulting in elevated loudness. Conversely the Soft setting uses longer Release times resulting in a softer output.
Output Meter
This meter indicates Peak Amplitude and potential inherent clipping.
Setting it Up
(1) Disable the Downward Expander (you will use it eventually). By the way – all Threshold faders support deactivation. Simply click the encapsulated yellow indicator located on each fader.
(2) Set the ARC flag to Soft and define a Leveler threshold.
(3) Adjust the High Level Compressor to (1) compress dynamics, and (2) compensate for the attenuated signal level.
(4) Apply 5 or 6dB of Low Level Compressor module gain. Tweak the module Threshold and readjust gain accordingly. Be cautious when applying excessive gain at levels above the defined threshold. Pay close attention to the noise floor.
(5) Lastly, adjust the High Level Compressor Gain to optimize the output.
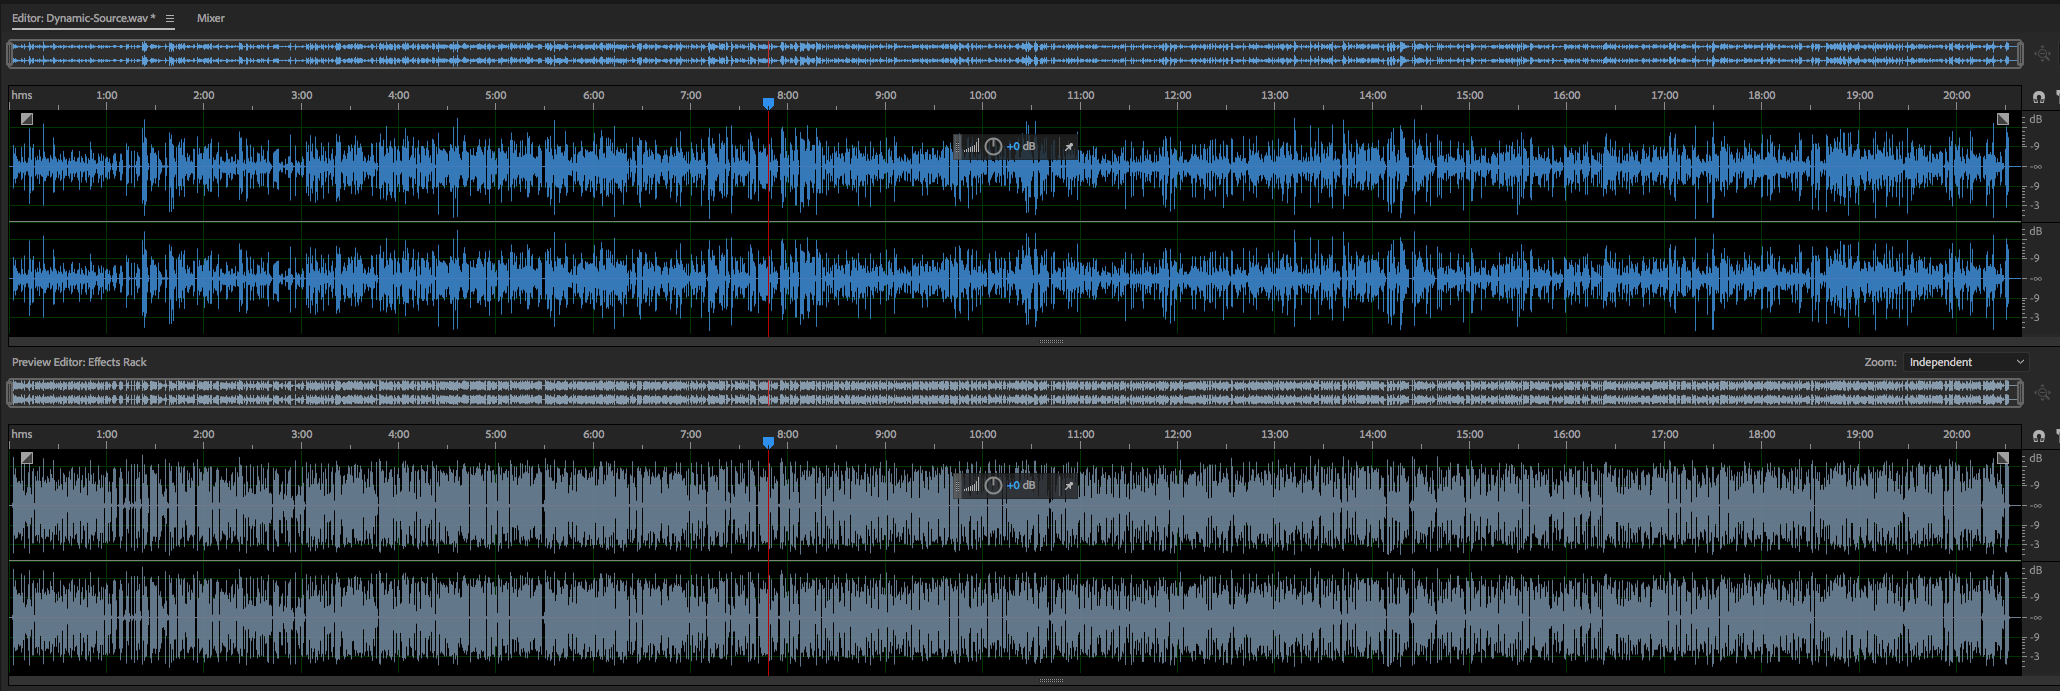
If you are running Adobe Audition – use the Preview Editor to reflect the results of your settings relative to the source. The updated waveform will indicate the results of the applied settings. Observe the processed dynamics and evaluate the audible consistency of the average loudness over time.
Of course visual attributes of any waveform are meaningless if the sound quality is compromised. Use those ears to achieve optimum results.
Notes
It’s important to establish a clear understanding of each processing module and the interactive processing results.
If necessary – apply Broadband Noise Reduction and/or Phase Rotation before MaxxVolume in your signal processing chain.
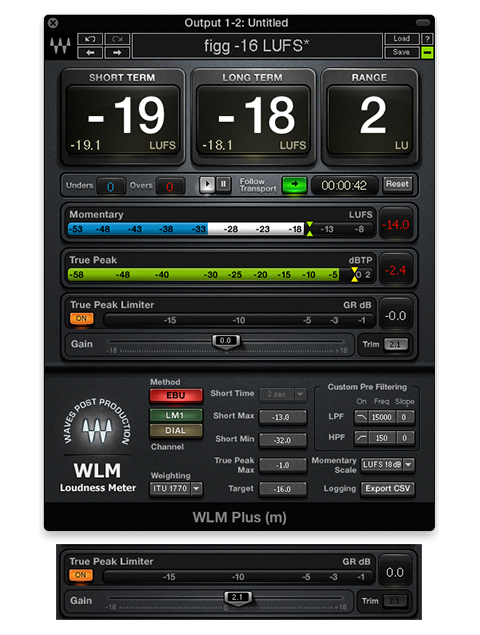
Remember – the High Level Compressor Gain does not establish a hard limited compliance ceiling! You will need to Insert a post compliance limiter. I recommend the following limiters: ISL by Nugen Audio and Elixir by Flux. TrackLimit by DMG Audio is also a worthy consideration.
Specialized Use Cases for MaxxVolume
• Intelligibility optimization
• Pre-Loudness Normalization dynamics processing
• Live Streaming
• Live Venue processing
Personal Perspective
– -> On multiple occasions I’ve expressed how it can be difficult working with non-scalable audio plugins on high-resolution monitors. I am a proponent of defining specific numerical setting values on supported plugins in order to fine tune parameters. Legacy UI designs offered by various developers generally exhibit fuzzy text and difficult to read values. These difficulties are prevalent when running monitor resolutions higher than 1920×1080 (I run a 4k compatible monitor at 2560×1440). In essence, viewing MaxxVolume’s fader values and additional indicators can be visually challenging.
– -> Be careful when using the Low Level Compressor. Excessive gain will elevate breaths and boost the audible noise floor.
– -> An integrated compliance limiter would be useful. As it stands, the insertion of a down-stream limiter is vital.
-paul.