Pro Tools Aux I/O Customization

Avid’s latest Pro Tools update [2022.9] includes Aux I/O support for internal audio connections and assignments using Core Audio devices that are supplemental Extensions to the main Playback Engine. 

Extensions as such may include supported hardware plus preexisting and/or Pro Tools supplied virtual devices. Virtual Devices are referred to as Audio Bridges.

To access the Aux I/O configuration window: [Setup menu] … I/O. Press Aux I/O button under Input or Output tabs.

You will notice Pro Tools supplied Audio Bridges are listed in the Device Name column. Their attributes (e.g. channel configuration) are fixed in this window. In essence you cannot customize the noted attributes. ** See below for a workaround. 

Users can edit associated Display Name references representing the instance of any listed Device. Do this by simply activating an editable text field.

** To customize a Pro Tools Audio Bridge Device Name and channel configuration:

Access and edit the ProToolsAudioBridge.config text file:

Path: Macintosh HD/Library/Audio/Plug-Ins/HAL/ProToolsAudioBridge.driver/Contents/Resources

Example

In the displayed image the listed Audio Bridge in line 4 read by default:

2,Pro Tools Audio Bridge 2-A

That’s a 2 channel device (2/2 discrete) followed by the name of the Audio Bridge.

I edited the line 4 reference to read:

1,PT MONO VD

Results: Channel configuration is now 1×1 (discrete MONO) with a customized Device Name: PT MONO VD. It’s reference will be updated in Mac System Preferences/Sound options for possible system wide use as well.

It appears Avid is providing support to add up to 16 lines/devices in the configuration file. I concluded a full system restart is necessary in order to instantiate customized configurations.

Note Aux I/O is not available in “Pro Tools Intro.”

-paul.

Understanding Pan Mode Options

Adobe Audition and Logic Pro X include Pan Mode preference options that determine track output gain for center panned mono clips included in stereo sessions. These options are often the source of confusion when working with a combination of mono and stereo clips, especially when clips are pre-Loudness Normalized prior to importing.

In Audition, the Left/Right Cut (Logarithmic) option retains center panned mono clip gain. The -3.0 dB Center option, which by the way is customizable – will attenuate center panned mono clip gain by the specified dB value.

For example if you were targeting -16.0 LUFS in a stereo session using a combination of pre-Loudness Normalized clips, and all channel faders were set to unity – the imported mono clips need to be -19.0 LUFS (Integrated). The stereo clips need to be -16.0 LUFS (Integrated). The Left/Right Cut Pan Mode option will not alter the gain of the center panned mono clips. This would result in a -16.0 LUFS stereo mixdown.

Conversely the -3.0 dB Center Pan Mode option will apply a -3 dB gain offset (it will subtract 3 dB of gain) to center panned mono clips resulting in a -19.0 LUFS stereo mixdown. In most cases this -3 LU discrepancy is not the desired target for a stereo mixdown. Note 1 LU == 1 dB.

As stated Logic Pro X provides a similar level of Pan Mode flexibility. I’ve also tested Reaper, and it’s options are equally flexible.

Pro Tools

Pro Tools Pan Mode support (they call it Pan Depth) is somewhat restricted. The preference is limited to Center Pan Mode, with selectable dB compensation options (-2.5 dB, -3.0 dB, -4.5 dB, and -6.0 dB).

There are several ways to reconstitute the loss of gain that occurs in Pro Tools when working with center panned mono clips in stereo sessions. One option would be to duplicate a mono clip and place each instance of it on hard-panned discrete mono tracks (L+R respectively). Routing the mono tracks to a stereo output will reconstitute the loss of gain.

A second and much more efficient method is to route all individual instances of mono session clips to a stereo Auxiliary Input, and use it to apply the necessary compensating gain offset before the signal reaches the stereo Master Output. The gain offset can be applied using the Aux Input channel fader or by using an inserted gain trim plugin. Stereo clips included in the session can bypass this Aux and should be directly routed to the stereo Master Output. In essence stereo clips do not require compensation.

Example Session

Have a look at the attached Pro Tools session snapshot. In order to clearly display the signal path relative to it’s gain, I purposely implemented Pre-Fader Metering.

pt-pan_small

Notice how the mono spoken word clip included on track 1 is routed (by way of stereo Bus 1-2) to a stereo Auxiliary Input track (named to Stereo). Also notice how the stereo signal level displayed by the meters on the Stereo Auxiliary Input track is lower than the mono source that is feeding it. The level variation is clear due to Pre-Fader Metering. It is the direct result of the session’s Pan Depth setting that is subtracting -3dB of gain on this center panned mono track.

Next, notice how the signal level on the Master Output has been reconstituted and is in fact equal to the original mono source. We’ve effectively added +3dB of gain to compensate for the attenuation of the original center panned mono clip. The +3dB gain compensation was applied to the signal on the Auxiliary Input track (via fader) before routing it’s output to the stereo Master Output.

So it’s: Center Panned mono resulting in a -3dB gain attenuation —>> to a stereo Aux Input with +3dB of gain compensation —>> to stereo Master Output at unity.

In case you are wondering – why not add +3dB of gain to the mono clip and bypass all the fluff? By doing so you would be altering the native inherent gain structure of the mono source clip, possibly resulting in clipping. My described workflow simply reconstitutes the attenuated gain after it occurs on center panned mono clips. It is all necessary due to Pro Tool’s Pan Depth methods and implementation.

-paul.

Utilizing Multiple Outputs for Recording

The vast majority of audio industry professionals use DAWS running on proficient computer systems to record audio directly to secondary hard disks. For some reason direct to disk recording is not widely endorsed in the Podcasting space. Many consultants (for various reasons) advise against this recording method. Instead, they recommend the use of inexpensive hand-held solid state Recorders.

For instance I’ve heard a few people state “computers cause ground loops”, hence the widespread Portable Recorder recommendation. In my opinion that is a half-baked assertion. In fact, ANY electronic component in a signal chain (including your electrical system) is capable of producing inherent noise. Often the replacement of cheaply manufactured components (interfaces, mixers, processors, cables, etc.) will solve audible noise problems. The key is to isolate the source and correct or replace it.

Portable Recorders are well suited for location interviews and video shoots. For in-studio sessions I feel direct to disk recording on a proficient system is much more flexible compared to the use of an external device. More so, the sole use of a Portable Recorder without a proper backup strategy is flat out risky.

That being said I thought I would document a basic Skype Recording session that I implemented in Pro Tools using a multi-output Motu Audio Interface. The incoming audio will be recorded on a secondary hard disk installed (or interfaced) on the host system. The real time session audio will also be routed to an alternate Interface Output, feeding an external Recorder for backup purposes.

Recording_Session_small

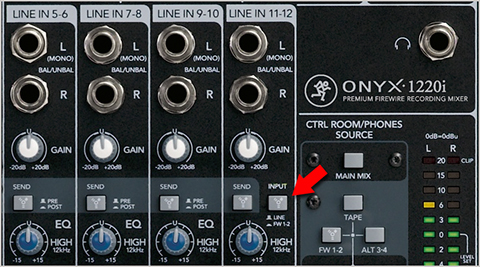
Note a multi-output Mixer can be used in place of an Audio Interface. As far as software you can use any modern DAW to replicate the described session. If you are using a Mac, Rogue Amoeba’s distinctive Audio Hijack application is also highly capable.

Objectives:

1-Record Studio Host and Skype Participant on discrete mono tracks in real time.

2-Combine the discrete recordings and create a split-stereo clip with independent dynamics processing applied to each channel, all in real time.

3-Use a Pre-Fader Send to independently control the level of the split-stereo discrete recording, and patch the real time signal to the Interface S/PDIF Output. This will feed the external Recorder’s S/PDIF Input.

4-Monitor the session through Headphones and play out through Desktop near-field Monitors.

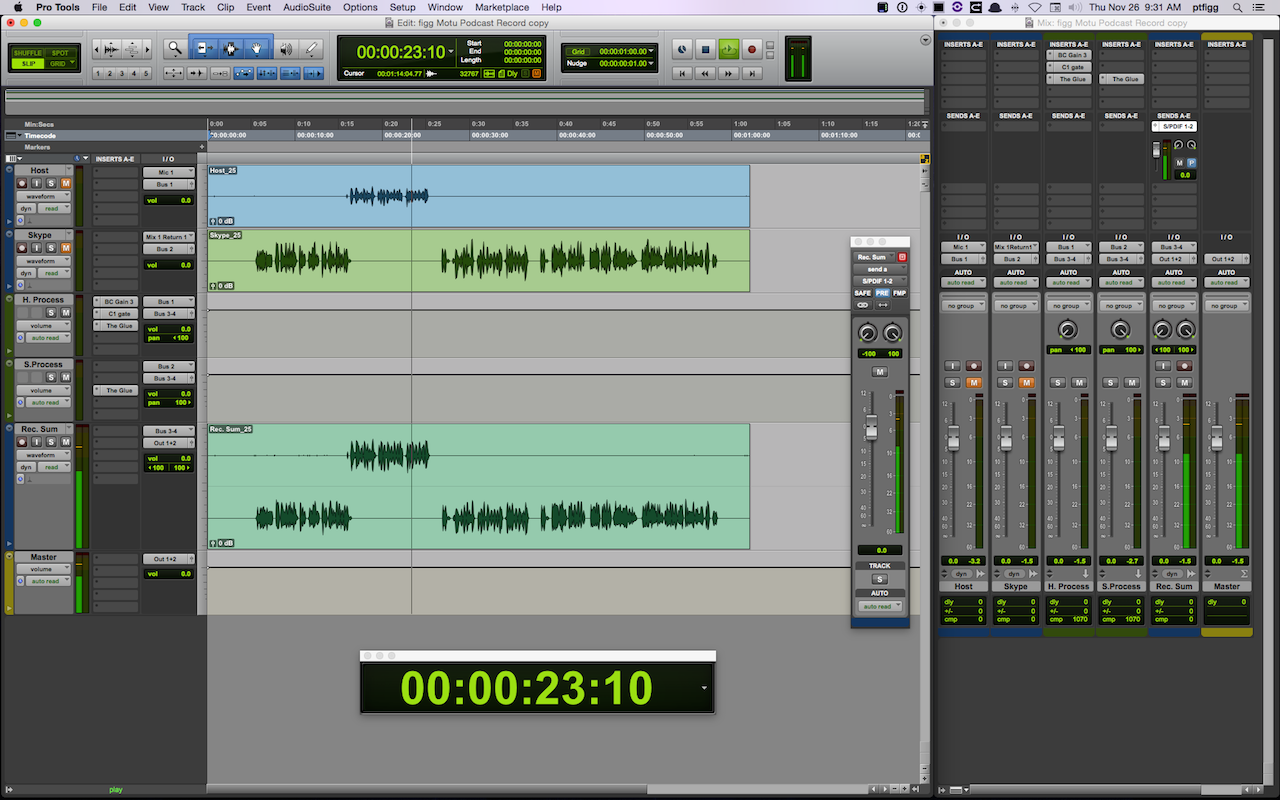
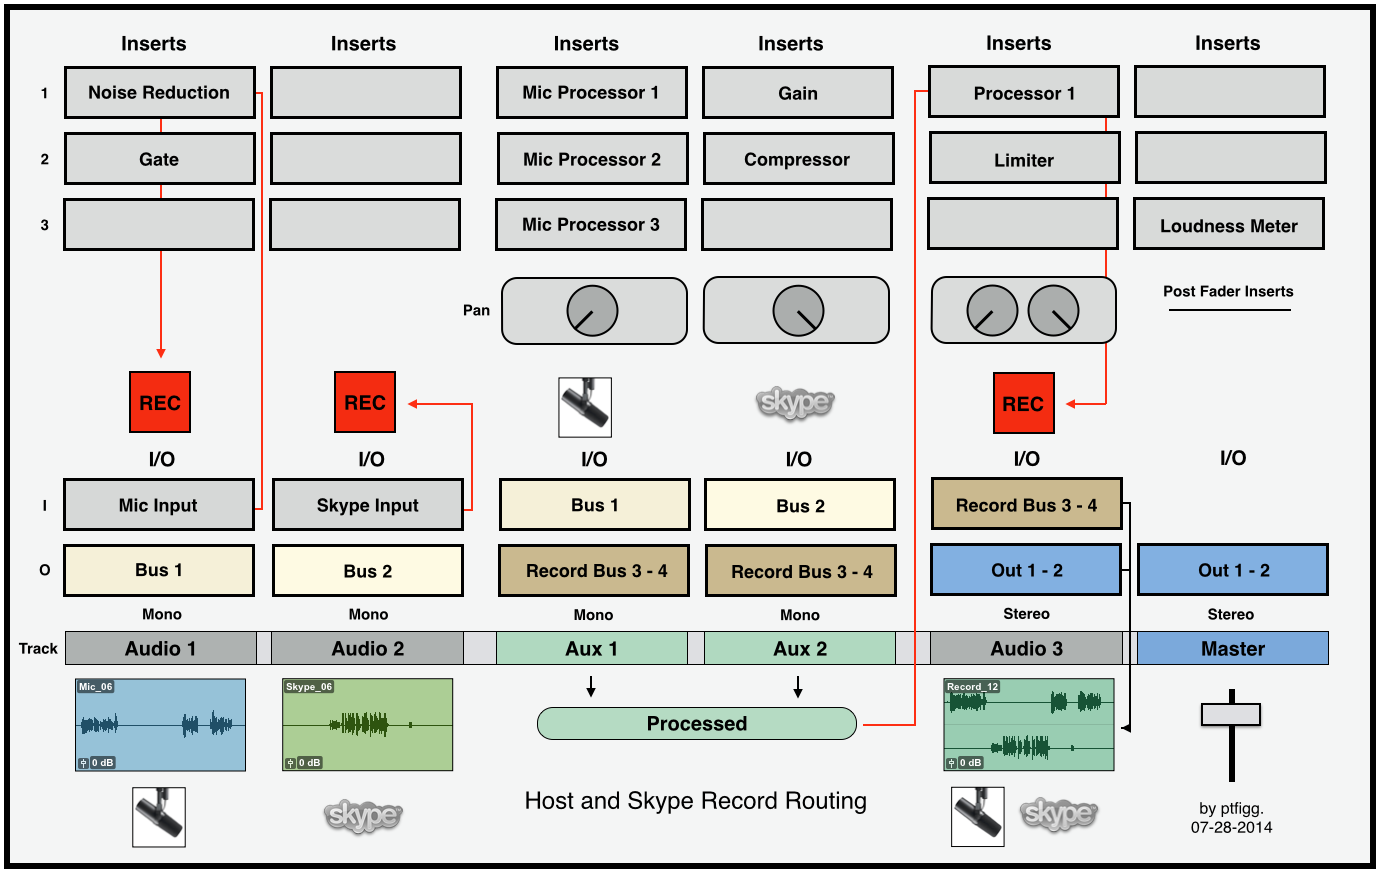
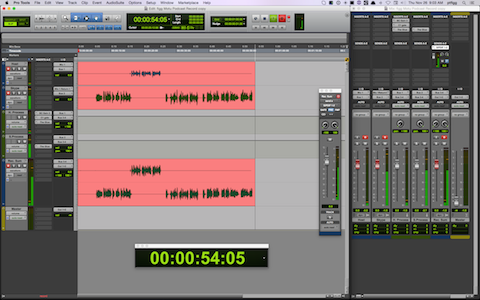
Please review the displayed Pro Tools session snapshot.

• The Input for the mono Host track is the Interface connected mic. The Input for the mono Skype track is “Mix 1 Return.” This is an Interface supported feature, allowing the operator to route the computer’s Output (in this case Skype) to an available DAW Input. This configuration effectively creates a mix-minus with discrete, unprocessed recordings on individual mono tracks.

• The mono recording tracks are routed to individual mono Aux Input tracks using Buses. The Aux Input tracks are hard-panned L+R and contain various inserted processing options, including a Gain Trim, Expander, and Compressor.

The processing applied in this session is not intended to replace what would normally occur in post. The Compressors are there just to tame dynamics in the event either participant exceeds nominal input levels. The Expander is set up to apply mild attenuation when the host is not speaking.

• The Aux Input tracks have their Outputs set to a common stereo Bus.

• Finally a third standard stereo audio track (Rec-Sum) uses the stereo Bus Output(s) as it’s Inputs. By hard panning the channels L+R we are able to maintain discrete channel separation within any printed stereo clip.

To record the discrete raw audio and the processed split-stereo audio in real time, we simply arm all session Audio tracks to record and fire away. The session can be monitored through Headphones and played out through near fields via the Main Output.

Secondary Output

The Motu Interface used for this session has a total of 8 Outputs, including a stereo S/PDIF option. I implemented Pre-Fader Send on the session’s Rec-Sum channel with it’s Output set to S/PDIF. This will route the track’s split-stereo audio to the S/PDIF stereo Input of an external Marantz CF Recorder. With the Send designated as Pre-Fader, it’s level control will be independent of the parent (Rec-Sum) channel fader, thus allowing discrete control of the real time signal being fed to the Recorder.

Note in the displayed Pro Tools session snapshot – the floating fader positioned to the left of the mixer is a user friendly and easily accessible copy of the much smaller Send fader displayed in the parent (Rec-Sum) track.

In summary, we can successfully initialize and capture 4 recordings in a single pass: the raw Host audio, the raw Skype participant audio, a split-stereo processed version of the Skype session, and a split-stereo copy of the processed Skype session stored on the Recorder.

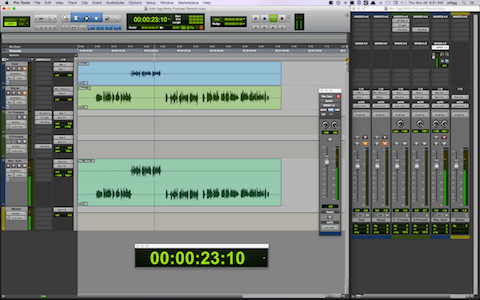
The image below displays the completed session with the split-stereo clip playing through the Main Outputs.

Mix_small

My general recommendation:when it is feasible, use direct to disk and Portable recording options in unison on a proficient system to capture in-studio multitrack and single participant Podcast sessions.

-paul.

Skype in the Box …

Scenario:

Studio Host and Skype participant to be recorded inside your DAW utilizing a slightly advanced configuration.

The session will require a proper mix-minus using your mixer’s Aux Send to feed the Skype Input – minus the Skype participant.

Objectives:

[– Two discrete mono Host/participant recordings with minimal or no processing.

[– Host Mic routed through a voice processing chain using plugins.

[– Incoming Skype routed through a compressor to tame levels, if necessary.

[– One fully processed stereo mix of the session with the Host audio on the left channel and the Skype participant on the right channel.

[– Real time recording and output.

There are certainly various ways to accomplish these objectives utilizing a Bounce to Track concept. The optional inserted plugins and even the routing decisions noted below are entirely subjective. And success with this implementation will depend on how resourceful your system is. I would recommend that you send the session audio out in real time to an external recorder for backup.

Configuration:

This particular example works well for me in Pro Tools. I tried to make this design as generic as possible. My guess is you will have no trouble applying these concepts in any professional DAW. (Click to enlarge)

Skype-NEW-480

Setup:

First I’ll mention that I’m using a Mackie Onyx 1220i Firewire Mixer. This device is defined as my default system I/O. The mixer has a sort nifty feature that allows the creation of a mix-minus just by the press of a button.

onyx-480

Pressing the Input button located on the mixer’s Line In 11-12 channel(s) sets the computer’s audio output as the channel’s input, passing the signal through Firewire 1-2. Disengaging this button will set the Input(s) to Line and the channels’s 1/4″ Input jacks would become active.

Skype recognizes the mixer as the default I/O. So I plug my mic into the mixer’s Channel 1 Input and hard-pan left. I then hard-pan Channel(s) 11-12 right. With the Input button pressed – I can hear Skype. In order to create a successful mix-minus you need to tell the mixer to prevent the Skype input from being inserted back into the Main Mix. These options are located in the mixer’s Source Matrix Control area.

This configuration translates into a Pro Tools session by setting the Track 1 Input (mono) to Onyx Channel 1 and the Track 2 Input (mono) to Onyx Channel 12. I now have discrete channels of audio coming into Pro Tools on independent tracks.

Typically I insert noise reduction plugins on the Mic Input Channel. A Gate basically mutes the channel when there is no signal, and iZotope’s Dialog DeNoiser handles problematic broadband noise in real time. At this stage the Skype Input is recorded with no processing.

Next, both Input Channels are bused out to independent mono Auxiliary Inputs that are hard-panned left + right respectively in preparation to route the passing audio to a Stereo Record bus. To process the mic signal passing through Aux 1 I usually insert something like Waves MaxxVolume, FabFilter’s Pro-DS, and Avid’s Impact Compressor.

For the Skype audio passing through Aux 2, I might insert a gain stage plugin and another instance of Avid’s Impact Compressor. This would keep the Skype audio in check in the event the guest’s delivery is problematic.

The last step is to bus out the processed audio to a Stereo Audio Track with it’s channels hard-panned left + right. This will maintain the channel separation that we established by hard-panning the Aux Inputs. On this track I may insert a Loudness Maximizer and a Peak Limiter. The processed and recorded stereo file will contain the Mic audio on the Left Channel and the Skype audio on the Right Channel.

Finally you’ll notice I have a Loudness Meter inserted on the Master in one of the Pro Tools Post Fader inserts. Once a session is completed I can disarm the “Record” track and monitor the stereo mixdown. Since the Loudness Meter will be operating Post Fader, I can apply a global gain offset using the Master Fader. Output measurements will be accurate. Of course at this point the channels that contain the original discrete mono recordings would need to be muted.

Notes

All the recording and processing steps in this session can be executed in real time. You simply define your Inputs, add Inserts, set up panning/routing, and finally arm your tracks to record. You will be able to converse with the Skype guest as you monitor the session through the mixer’s headphone output with no latency issues. When the session ends you will have access to independent mono recordings for both participants and a processed stereo mix with discrete channels.

Note that you can also implement this workflow as a two step process by first recording the Host/Skype session as discrete mono files. Then Bounce to Track (or Disk) to create the stereo mixdown.

Again the efficiency of this workflow will depend on how resourceful your system is. You might consider running Skype on a separate computer. And I reiterate: as you record in the box, consider sending the session audio out to an external recorder for backup.

-paul.