Skype in the Box …

Scenario:

Studio Host and Skype participant to be recorded inside your DAW utilizing a slightly advanced configuration.

The session will require a proper mix-minus using your mixer’s Aux Send to feed the Skype Input – minus the Skype participant.

Objectives:

[– Two discrete mono Host/participant recordings with minimal or no processing.

[– Host Mic routed through a voice processing chain using plugins.

[– Incoming Skype routed through a compressor to tame levels, if necessary.

[– One fully processed stereo mix of the session with the Host audio on the left channel and the Skype participant on the right channel.

[– Real time recording and output.

There are certainly various ways to accomplish these objectives utilizing a Bounce to Track concept. The optional inserted plugins and even the routing decisions noted below are entirely subjective. And success with this implementation will depend on how resourceful your system is. I would recommend that you send the session audio out in real time to an external recorder for backup.

Configuration:

This particular example works well for me in Pro Tools. I tried to make this design as generic as possible. My guess is you will have no trouble applying these concepts in any professional DAW. (Click to enlarge)

Skype-NEW-480

Setup:

First I’ll mention that I’m using a Mackie Onyx 1220i Firewire Mixer. This device is defined as my default system I/O. The mixer has a sort nifty feature that allows the creation of a mix-minus just by the press of a button.

onyx-480

Pressing the Input button located on the mixer’s Line In 11-12 channel(s) sets the computer’s audio output as the channel’s input, passing the signal through Firewire 1-2. Disengaging this button will set the Input(s) to Line and the channels’s 1/4″ Input jacks would become active.

Skype recognizes the mixer as the default I/O. So I plug my mic into the mixer’s Channel 1 Input and hard-pan left. I then hard-pan Channel(s) 11-12 right. With the Input button pressed – I can hear Skype. In order to create a successful mix-minus you need to tell the mixer to prevent the Skype input from being inserted back into the Main Mix. These options are located in the mixer’s Source Matrix Control area.

This configuration translates into a Pro Tools session by setting the Track 1 Input (mono) to Onyx Channel 1 and the Track 2 Input (mono) to Onyx Channel 12. I now have discrete channels of audio coming into Pro Tools on independent tracks.

Typically I insert noise reduction plugins on the Mic Input Channel. A Gate basically mutes the channel when there is no signal, and iZotope’s Dialog DeNoiser handles problematic broadband noise in real time. At this stage the Skype Input is recorded with no processing.

Next, both Input Channels are bused out to independent mono Auxiliary Inputs that are hard-panned left + right respectively in preparation to route the passing audio to a Stereo Record bus. To process the mic signal passing through Aux 1 I usually insert something like Waves MaxxVolume, FabFilter’s Pro-DS, and Avid’s Impact Compressor.

For the Skype audio passing through Aux 2, I might insert a gain stage plugin and another instance of Avid’s Impact Compressor. This would keep the Skype audio in check in the event the guest’s delivery is problematic.

The last step is to bus out the processed audio to a Stereo Audio Track with it’s channels hard-panned left + right. This will maintain the channel separation that we established by hard-panning the Aux Inputs. On this track I may insert a Loudness Maximizer and a Peak Limiter. The processed and recorded stereo file will contain the Mic audio on the Left Channel and the Skype audio on the Right Channel.

Finally you’ll notice I have a Loudness Meter inserted on the Master in one of the Pro Tools Post Fader inserts. Once a session is completed I can disarm the “Record” track and monitor the stereo mixdown. Since the Loudness Meter will be operating Post Fader, I can apply a global gain offset using the Master Fader. Output measurements will be accurate. Of course at this point the channels that contain the original discrete mono recordings would need to be muted.

Notes

All the recording and processing steps in this session can be executed in real time. You simply define your Inputs, add Inserts, set up panning/routing, and finally arm your tracks to record. You will be able to converse with the Skype guest as you monitor the session through the mixer’s headphone output with no latency issues. When the session ends you will have access to independent mono recordings for both participants and a processed stereo mix with discrete channels.

Note that you can also implement this workflow as a two step process by first recording the Host/Skype session as discrete mono files. Then Bounce to Track (or Disk) to create the stereo mixdown.

Again the efficiency of this workflow will depend on how resourceful your system is. You might consider running Skype on a separate computer. And I reiterate: as you record in the box, consider sending the session audio out to an external recorder for backup.

-paul.

Podcasting System featuring the Allen & Heath XB-10 Console …

I continue to look around for a Broadcast Console that would be suitable to replace my trusty Mackie Onyx 1220i FW mixer. I was always aware of the XB-10 by Allen & Heath, although I did not pay much attention to it due to it’s use of pot-styled channel faders as opposed to sliding (long-throw) faders.

ah-mixer-480

Last evening I skimmed through the manual for the XB-10. Looking past the pot-styled fader issue this $799 console is packed with features that make it highly attractive. And it’s smaller than my Mackie, checking in at 13.2 inches wide x 10 inches deep. Allen & Heath also offers the XB-14-2 Console. It checks in at 15.2 inches wide x 18.3 inches deep with ample surface space for long-throw sliding faders. Bottom line is it’s larger than my Mackie and the size just doesn’t work for me.

XB-10: The Basics

Besides all the useful routing options, the XB-10 has a dedicated Mix-Minus channel that can be switched to receive the output of a Telephone Hybrid or the output of the bi-directional USB bus. In this case it would be easy to receive a Skype guest from a computer.

The console has latching On/Off switches on all input channels, supports pre-fader listening, and has built-in Compressors on channels 1-3. The manual states ” … the Compressor is optimized to reduce the dynamic range of the presenter microphone(s). Low signal levels are given a 10dB gain boost. Soft Knee compression activates at -20dBu, and higher level signals are limited.” Personally I would use a dedicated voice processor for the main presenter. However having the dynamics processing on-board is a useful feature, especially when adding additional presenters to the program mix.

The XB-10 is also equipped with an Output Limiter that can be used to ensure that the final mix does not exceed a predefined level. There is an activation switch located on the back panel of the device with a trim pot control to set the limiting threshold. If the Limiter is active and functioning, a front panel LED illuminates.

One other feature that is worth mentioning is the Remote Connector interface located on the back of the device. This can be used to implement CD player remote triggering, ON AIR light illumination, and external metering options.

I decided to design a system using the XB-10 as the controller that is suitable for flexible Podcast Production and Recording. Bear in mind I don’t have any of these system components on hand except for older versions of the dbx Voice Processor and the Telos Phone Hybrid. I also have a rack-mounted Solid State Recorder by Marantz, similar to the Tascam. I’m confident that all displayed components would work well together yielding excellent results.

Also note there are many ways to integrate these components within the system in terms of connections and routing. This particular design is similar in concept to how I have my current system set up using the components that I currently own (Click to Enlarge).

AH-system-480

System Design Concepts and Selections

The mic of choice is the Shure SM7B. The was the first broadcast style mic that I bought back in 2004 and it’s one of my prized possessions. As far as I’m concerned it’s the most forgiving broadcast mic available, with one caveat – it requires a huge amount of clean gain to drive it. Common +60dB gain trims on audio mixers will not be suitable, especially when setting the gain near or at it’s highest level. This will with no doubt result in problematic noise.

In my current system I plug my dynamic mic(s) into my dbx 286a Voice Processor (mic input) and then route the processor’s line output to a line input on one of the Mic channels on my Mackie mixer. By doing so I pick up an additional +40dB of available gain to drive the mic. Of course this takes a bit of tweaking to get the right balance between the gain setting on the processor and the gain setting on the Mackie. The key is not to max out either of the gain stages.

I’ve recreated this chain in the new design using the updated dbx 286s. In doing so the primary presenter gets the voice processor on her channel. If there is the necessity to expand the system by introducing a second presenter, I’ve implemented the Cloudlifter CL-1 gain stage between the mic and the console’s mic input on channel 2. The CL-1 will provide up to +20dB of additional clean gain when using any passive microphone. Finally I point to the availability of the on-board dynamics processor and consider this perfectly suitable for a second presenter.

I mentioned the XB-10 has a dedicated telephone interface channel with a built in mix-minus. Once again I’ve selected the Hx1 Digital Telephone Hybrid by Telos Systems for use in this system. The telephone interface channel can be set to receive an incoming telephone caller or something like the Skype output coming in from a computer. I’ve taken this a step further by also implementing an analog Skype mix-minus using the Console’s Aux Send to feed the computer input. The computer output is routed back into the Console on an available channel(s).

As noted the USB interface on the Console is bi-directional. One use case scenario would be to use the computer USB output to send sound effects and audio assets into the program mix. (I am displaying QCart for Mac as a possible option).

The rest is pretty self explanatory. I’m using the Monitor output bus to feed the studio speakers. The Console’s Main outputs are routed to the Tascam recorder, and it’s outputs are routed to an available set of inputs on the Console.

Like I said I’m fairly confident this system design would be quite functional and well suited for flexible Podcast Production and Recording.

In closing beginning in 2004 besides designing sort of generic systems based on various levels of cost and complexity, it was common for an aspiring Podcast Producer to reach out to me and ask for technical assistance with the components they purchased. In this case I would build detailed diagrams for the producer much the same as the example included in this post. A visual representation of system routing and configuration is a great way to expidite setup when and if the producer who purchased the gear is overwhelmed.

Note:

At one time I was providing a service where two individual participants were simultaneously calling into my studio for interview session recording. Since I had two dedicated phone lines and corresponding telephone hybrids, the participants were able two converse with each other using 2 Aux buses, in essence by creating two individual mix-minuses.

Here is the original diagram that I built in October 2006 that displays the routing of the callers via Aux sends:

dual-mm-480

Even though the XB-10 console contains a single Aux bus, a similar configuration may still be possible where an incoming caller from the telephone hybrid would be able to converse with a Skype guest, minus themselves. I need to read into this further before I am able to make a determination on whether this is supported.

Components:

[– Shure SM7B Broadcast Dynamic Microphone
[– Cloudlifter CL-1 Gain Stage
[– Allen & Heath XB-10 Broadcast Console
[– dbx 286s Voice Processor
[– Telos Hx1 Digital Telephone Hybrid
[– Tascam SS-R200 Solid State Recorder

Optional:

[– QCart for Mac OSX
[– KRK Rokit 5 Powered Studio Monitors

-paul.

Fresh Air Podcast: Audio Analysis …

In my No Free Pass for Podcasts post I talked about why the Broadcast Loudness specs. are not necessarily suitable for Podcasts. I noted that the Program Loudness targets for EBU R128 and ATSC A/85 are simply too low for internet and mobile audio distribution. Add excessively dynamic audio to the mix and it will complicate matters further, especially when listeners use mobile devices to consume their media in less than ideal ambient spaces.

fa-processed

Earlier today I was discussing this issue with someone who is well versed in all aspects audio production and loudness processing. He noted that ” … the consensus of it all is, that it is a bad idea to take a really nice standard that leaves plenty of headroom and then start creating new standards with different reference values.” The fix would be to “keep production and storage at -23.0 LUFS and then adjust levels in distribution.” Valid points indeed. However in the real world this mindset is unrealistic, especially in the internet/mobile/Podcasting space.

The fact of the matter is there is no way to avoid the necessity to revise the standards that simply do not work on a platform that consists of unique variables.

And so considering these variables, the implementation of thoughtful, revised, best practices that include platform specific targets for Program Loudness, Loudness Range, and True Peak are unavoidable. Independent Podcasters and network driven Podcasts using arbitrary production techniques and delivery methods simply need direction and guidance in order to comply. In the end it’s all about presenting well produced media to the listener.

Recently I came across a tweet where someone stated “I love the show but it is consistently too quiet to listen to on my phone.” They were referring to the NPR program Fresh Air. I’m not exactly sure if this person was referring to the radio broadcast stream or the distributed Podcast. Either way it’s an interesting assertion that I can directly relate to.

I subscribe to the Fresh Air Podcast. This will probably not surprise you – I refuse to listen to the Podcast right out of the box. When a new show pops up in Instacast, I download the file, decode to WAV, convert to stereo, and then reprocess the audio. I tweak the dynamic range and address show participant audio level variations using various plugins. I then bump things up to -16.0 LUFS (using what I like to refer to as “The Lund Method”) while supplying enough headroom to comply with -1.0 dBTP as my ultimate ceiling. I’ll get into the specifics in a future post.

According to the leading expert Mr. Thomas Lund:

“Mobile and computer devices have a different gain structure and make use of different codecs than domestic AV devices such as television. Tests have been performed to determine the standard operating level on Apple devices. Based on 1250 music tracks and 210 broadcast programs, the Apple normalization number comes out as -16.2LKFS (Loudness, K-weighted, relative to Full Scale) on a BS.1770-3 scale.

It is, therefore, suggested that when distributing podcast or Mobile TV, to use a target level no lower than -16LKFS. The easiest and best-sounding way to accomplish this is to: 1) Normalize to target level (-24LKFS); 2) Limit peaks to -9dBTP (Units for measurement of true peak audio level, relative to full scale); and 3) Apply a gain change of +8dB. Following this procedure, the distinction between foreground and background isn’t blurred, even on low-headroom platforms.”

In this snapshot I demonstrate the described workflow. I’m using two independent instances of the bx_control plugin to apply the gain offsets at various stages of the signal flow. After the initial calculated offset is applied, the audio is routed through the Elixr True Peak Limiter and then out through the second instance of bx_control applying +8dB of static gain. You can also replicate this workflow on an off-line basis. Note that I’ve slightly altered the limiting recommendation.

Lund-small

So why do I feel the need to do this?

Podcast Source

These are the specs. and the waveform overview of a recently published Fresh Air Podcast in it’s entirety:

raw-specs
fa-source-complete

Next is a 3 min. audio segment lifted from the published Podcast. The stats. display measurements of the attached 3 min. segment:

source_revised
source-1

Podcast Optimized for Internet/Mobile

Below is the same 3 min. segment. I reprocessed the audio to make it suitable for Podcast distribution. The stats. display measurements of the attached audio segment:

web-specs-2
source-2

The difference between the published source audio and the reprocessed version is quite obvious. The Loudness Normalized audio is so much more intelligible and easier to listen to. In my view the published audio is simply out of spec. and unsuitable for a Podcast.

Bear in mind the condition of the source audio is not uncommon. The problems that persist are not exclusive to podcasts distributed by NPR or by any of their affiliates. Networks with global reach need to recognize their Podcast distribution platforms as important mechanisms to expand their mass appeal.

It has been noted that the Public Radio community in general is exploring ways to enhance the way in which they produce their programs with focus on loudness standardization. My hope hope is this carries over to their Podcast platforms as well.

-paul.

For more information please refer to “Managing Audio Loudness Across Multiple Platforms” by Thomas Lund at TVTechnology.com.

No Free Pass for Podcasts …

I think it was in the mid to late 1980’s. I was still living home, totally fixated on what was happening with Television devices, programming and transmission. Mainly the advent of MTS Stereo compatible TV’s and VCR’s. I remember waiting patiently for weekly episodes of programs like Miami Vice and Crime Story to air. I would pipe the program audio through my media system in glorious MTS stereo. For me this was a game changer.

vice

I also remember it was around the same time that Cable TV became available in the area. I convinced my Mom and Dad to allow me to order it. Initially it was installed on the living room TV, and eventually made it’s way on to additional TV’s throughout our home. For the most part it was a huge improvement in terms of reception and of course program diversity.

However there was one issue that struck me from the very beginning: the wide variations in loudness between network TV Shows, Movies, and Adverts. In fact it was common for targeted, poorly produced, and exceedingly loud local commercials to air repeatedly throughout broadcast transmissions. Reaching for the remote to apply volume attenuation was a common occurrence and a major annoyance.

Obviously this was not isolated. The issue was widespread and resulted in a public outcry to correct these inconsistencies. In 2010 The CALM Act was implemented. The United States and Europe (and many other regions) adopted and now regulate loudness standardization guidelines for the benefit of the public at large.

If there is anyone out there who cannot relate to this “former” problem, I for one would be very surprised.

Well guess what? We now have the same exact problem existing on the most ubiquitous media distribution platform in existence – the internet.

I realize any expectation of widespread audio loudness standardization on the internet would be unreasonable. There’s just too much stuff out there. And those who create and distribute the media possess a wide scope of skills. However there is one sort of passionate and now ubiquitous subculture that may be ripe for some level of standardization. Of course I’m referring to the thousands upon thousands of independenlty produced Podcasts available to the masses.

In the past I’ve made similar public references to the following exercise. Just in case you missed it, please try this – at you own risk!

Put on your headphones and queue up this episode of The Audacity to Podcast. Set your playback volume at a comfortable level, sit back, and enjoy. After a few minutes, and without changing your playback volume setting – queue up this episode of the Entrepreneur on Fire podcast.

waves-1

Need I say more?

From what I gather both programs are quite popular and highly regarded. I have no intension of suggesting that either producer is doing anything wrong. The way in which they process their audio is their artistic right. On the other hand in my view there is one responsibility they both share. That would be the obligation to deliver well produced content to their subscribers, especially if the Podcast generates a community driven revenue stream. It’s the one thing they will always have in common. And so I ask … wouldn’t it make sense to distribute media following audio processing best practices resulting in some level of consistency within this passionate subculture?

I suspect that some Podcast producers purposely implement extreme Program Loudness levels in an attempt to establish “supremacy on the dial.” This issue also exists in radio broadcast and music production, although things have improved ever since Loudness War participants were called to task with the inception of mandatory compliance guidelines.

I’ve also noticed that many prolific Podcast Producers (including major networks) are publishing content with a total lack of Program Loudness consistency within their own catalogs form show to show. Even more troubling, Podcast aggregation networks rarely specify standardization guidelines for content creators.

It’s important to note that many people who consume audio delivered on the internet do so in less than ideal ambient spaces (automobiles, subways, airplanes etc.) using low-fi gear (ear buds, headphones, mobile devices, and compromised desktop near fields). Simply adopting the broadcast standards wouldn’t work. The existing Program Loudness targets are simply unsuitable, especially if the media is highly dynamic. The space needs revised specs. in order to optimize the listening experience.

Loudness consistency from a Podcast listener’s perspective is solely in the hands of the producers who create the content. In fact it is possible producers may even share common subscribers. Like I said – the space is ripe for standardization.

Currently loudness compliance recommendations are sparse within this massive community driven network. In my view it’s time to raise awareness. A target specification would universally improve the listening experience and ultimately legitimize the viability of the platform.

For the record, I advocate:

File Format: Stereo, 128kbps minimum.
Program Loudness: -16.0 LUFS with acceptance of a reasonable deviation.
Loudness Range: 8 LU, or less.
True Peak Ceiling: -1.0 dBTP in the distribution file. Of course this may be lower.

Quick note: when I refer to Podcasts, from a general perspective I am referring to audio programs and videos/screencasts/tutorials that primarily consist of spoken word soundtracks. Music based Podcasts or cinema styled videos with high impact driven soundtracks may not necessarily translate well when the Loudness Range (and Dynamic Range) is constricted.

For further technical insight, please refer to “Audio for Mobile TV, iPad, and iPod” – Thomas Lund, TC Electronic.

-paul.

Cutting Edge Podcasting System …

It’s been a while since I’ve been called upon to design an audio system suitable for Podcasting. In 2004 I built a site that focused on all aspects of Podcast Production. I will (reluctantly) disclose that I am the person who coined the term “Podcast Rig.”

Besides a prolific user forum and gear reviews, the site included systems that I designed at various levels of price and complexity. They are still viable some 10 years later. I eventually sold the rights to the property and content, and the site was unfortunately buried beneath The Podcast Academy, a site that published audio recorded at various conferences and events. These days I’m still actively involved in the space, handling audio post for a select group of clients.

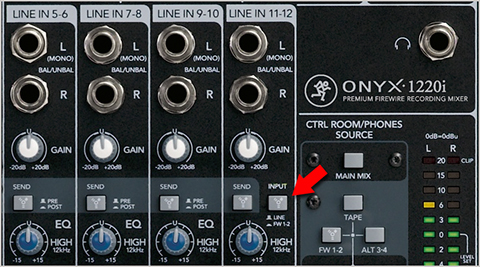
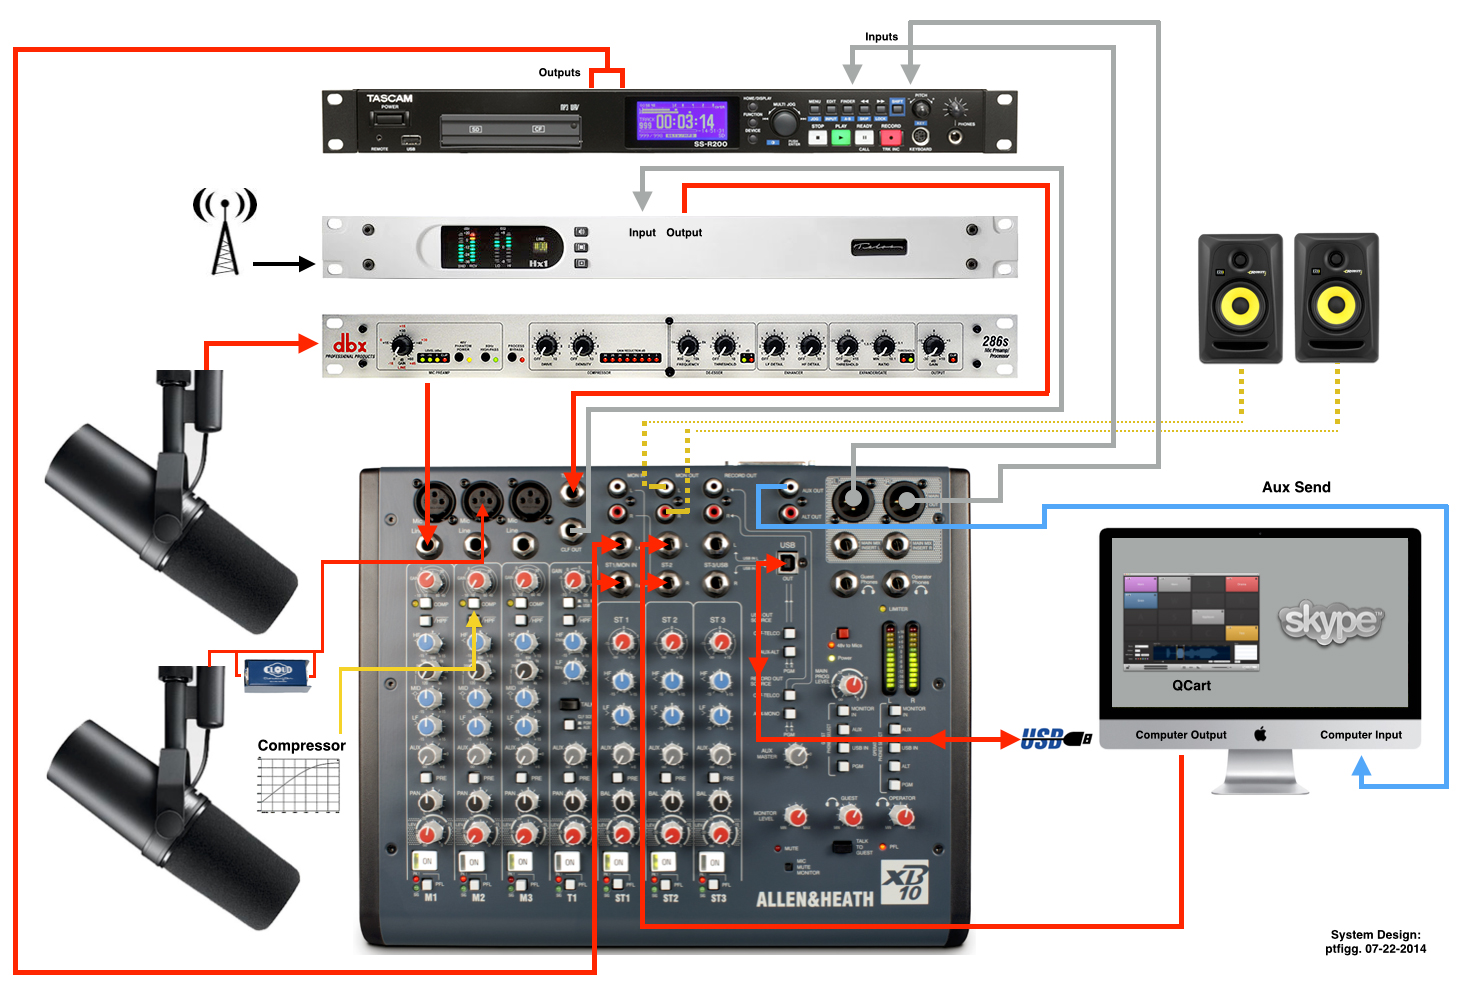
I continue to get a good amount of use out of the gear that I bought to record my own podcast (2004-2006). For instance I still have my Electrovoice RE-20 mic on my boom, with a Shure SM7B and a Heil PR-40 stored in my closet. I’m still using a Mackie Mixer (Onyx 1220i), and my rack is full of analog processors including an Aphex Compellor, a dbx mono compressor, a dbx voice processor, and a Telos One Digital Phone Hybrid. Up top in the rack I have a Marantz Solid State Compact Flash Recorder. At the very bottom I’ve integrated an NAD Power Amplifier that drives my near field monitors.

And I continue to keep a very close eye on on what’s out there with regards to suitable gear for Podcasting Systems. In fact I have a clear idea of what I would buy TODAY if I decided to replace the components in my current system. And it’s not a cheap solution intended for novices. In fact this new system is quite expensive. Relatively speaking, for the approximate cost of a custom 6-Core MacPro Tube – this is my vision for a cutting edge professional Podcasting System that I am convinced would supply a ton of flexibility and output reference quality audio.

The Console

Notice I make reference to Console instead of Mixer? This is by design. For the brain of my system I’ve decided on the Air-1 USB Radio Console by Audioarts Engineering.

air_1-NEW

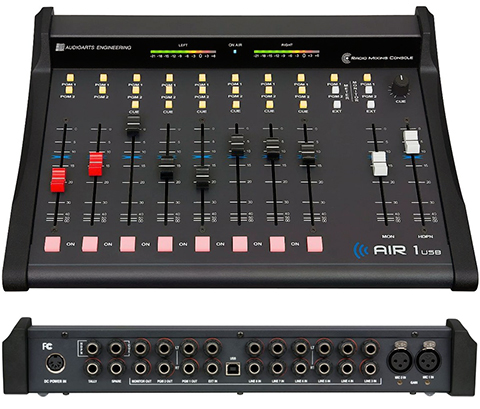
The Air-1 features two XLR Mic Inputs, six Balanced Stereo Input channels, USB I/O, two Program Buses, and a Cue Output. The active state of the input channels can be controlled by channel dependent On/Off push button switches. Routing to the Program Buses as well as the Cue Bus is also controlled by the use of push button switches that illuminate when active. The level of the Cue Bus is independently controlled by a dedicated pot. The console uses long-throw faders that are common on broadcast consoles, with independent faders for Monitor and Headphone outputs. By the way the Cue is a prefader Bus on the inputs that allows the operator to monitor off-air channels. It’s entirely separate from the main mix, or in this case – the Program Bus.

The USB I/O is bidirectional. It can be used to send and receive audio from a computer workstation for easy recording, playout, and automation system integration. There’s ample flexibility for Skype and easy setup for a telephone hybrid mix-minus. The device uses an external power supply that is included.

Note that many output options and routing configurations are customizable by way of Dipswitches located on the bottom of the chassis. Currently the AIR-1 retails for $1,789.00 at BSW.

The Processor

Since 2004 there have been a few audio processors that have been widely used by Podcast Producers. At first I recall the popularity of the affordable dbx 266XL (now discontinued) 2-channel Compressor Expander/Gate. Then there was the Aphex 230 Vocal Processor (also discontinued) that achieved early acceptance due to excellent marketing by Aphex and their recognition of Podcasting as a viable option for broadcasters to widen their reach. The device eventually attracted the interest of Podcast Producers who were willing to shell out upwards of $700 for this great sounding piece of gear.

These days (and much to my surprise) there is a fairly inexpensive Compressor/Limiter/Gate by Behringer that has steadily gained popularity in the space. From what I can tell this is due to a few prolific “Podcast Consultants” using the processor and recommending/selling it for whatever reason. Personally I was never a fan of the brand. But that’s just me.

For this new high end system I am selecting the Wheatstone/Vorsis M-1 Digital Mic Processor.

m-1

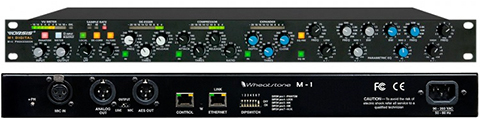
The processor uses sophisticated digital audio processing algorithms throughout it’s internal chain. On the back of the unit there is one AES digital output, one Mic input, and a single analog (XLR) output that can be set to pass Mic or Line Level signal. This is important in the design of this Podcasting System due to the way in which it would connect to the Air-1 Console. In essence the Mic would get connected to the processor input and the analog output switched to Mic Level would feed one of the dedicated Mic channels on the Console. There is also a Dipswitch matrix located on the back of the device that allows the operator to customize a few options and functions.

The M-1 supports variable Sample Rates, has switchable Phantom Power, Hi-Pass/Low-Pass filters, a De-Esser, Compressor, and Expander. There are independent Input and Output Gain pots and a Level Meter that can be switched to monitor Input or Output. There is also a De-Correlator function, also referred to as a Phase Rotator that will tweak waveform symmetry.

Also included is dual Parametric EQ with user defined frequencies, cut/boost control, and variable Q. In addition there are two independent Shelving filters that can be used to shape the overall frequency response of the signal. The EQ stage can be placed before or after the Compressor in the processing chain.

But that’s not all. The M-1 can be controlled and customized locally or remotely via Windows GUI software running on a PC. Note that although this feature is intriguing, it would be of no use to me based on my dependency to the Mac platform. In fact from what I can tell there may be some Windows operating system incompatibilities with the bundled software. This may very well cause difficulties running the Windows software on a Mac in an emulated environment. I’ll need to check into it. But like I said, with no native support for the Mac I would probably need to pass. Currently the M-1 Processor retails for $799.00 at BSW.

The Mic

At this point it would make very little sense to even consider purchasing yet another microphone based on my current lot (EV RE-20, Shure SM7B, and Heil PR-40). But I figured what the heck – why not explore and try something new? Note that I’ve never tested the following mic. So I’m shamelessly speculating that I would even like it!. What drew me to this mic was the reputation of the manufacturer and the stellar package deal that is currently available. The mic is the Telefunken M82 Broadcast.

mic

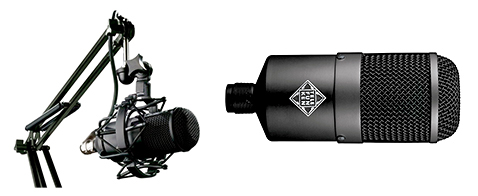
The M82 is an end-address, large diaphragm (35mm capsule) cardioid dynamic mic (Frequency Range 25Hz – 18kHz). What’s interesting is this mic is designed to be used as a kick-drum mic, yet it is well suited for broadcast voice applications. In fact if I recall the timeless EV-RE20 was also originally designed to be used as a kick-drum mic before it was widely embraced by radio and voice professionals.

Anyway the Telefunken supplies two separate EQ Switches:Kick EQ and High Boost. The Kick EQ engages a lower mid-range cut at around 350Hz. The High Boost shifts upper mid-range and high frequencies starting around 2kHz with a 6dB boost by 10kHz. Any combination of the two switches can be used to tailor the response of the mic.

Here is what really caught my attention – the mic is available in a Broadcast Package that includes the M786 Broadcast Boom with built in XLR cable, the M700 Shock Mount, and a protective case. Currently the M82 Broadcast Package retails for $499.00 at BSW.

The Hybrid

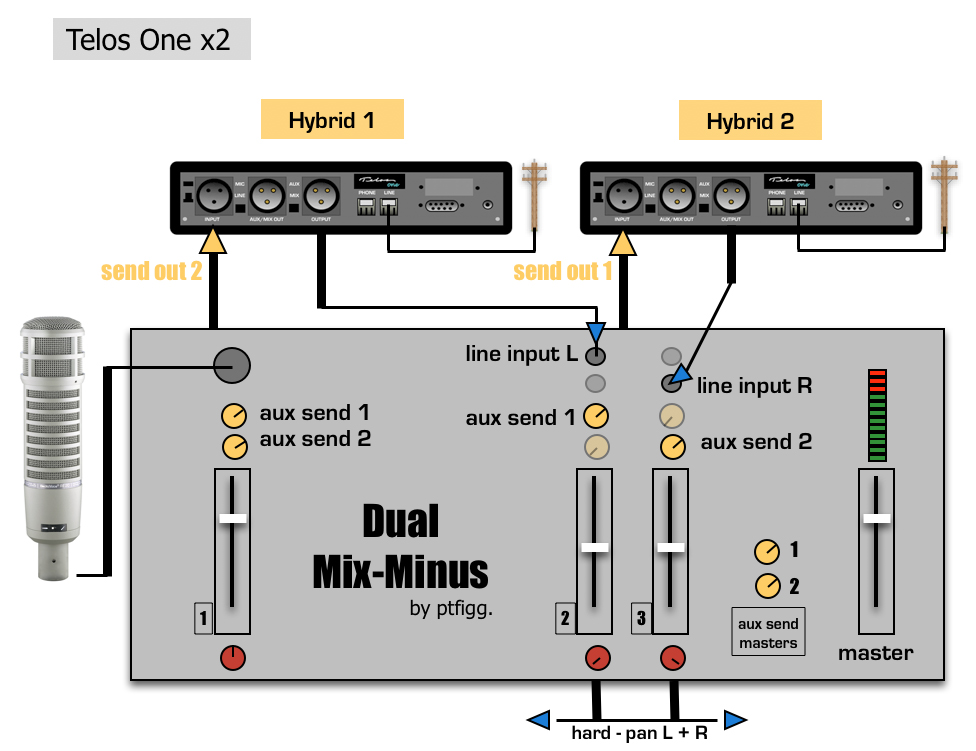
As far as I’m concerned any serious Podcast Producer who intends to incorporate remote guests needs to implement an easy alternative to the now ubiquitous Skype. A Digital Telephone Hybrid is the obvious choice, allowing program guests to call into the host system using a standard telephone line. With proper configuration of a mix-minus by the host, seamless communication can be achieved.

Sometime around 2010-2011, Telos Systems replaced the ubiquitous Telos One with the brand new Hx1 Hybrid. I’ve chosen this device for my system.

hybrid

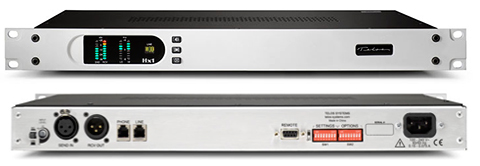
The Hx1 receives an analog “POTS” (Plain Old Telephone Service) line signal and implements digital conversion resulting in excellent audio quality. This Hybrid features automatic gain control in both directions, a ducking system, feedback reduction, and a digital dynamic EQ. The device is also capable of Auto-Answer functions for unattended operation.

Using the Program 2 Bus on the Air-1 Console to feed the Hx1 input, setting up a broadcast mix-minus would be a snap. In my current system I’ve placed a single channel dbx dynamics compressor between the output of my Telos One and the input used on my Mackie Board. This works pretty well. I’d need to test this setup with the Hx1 to determine whether the compressor would even be necessary. Currently the Telos Hx1 Digital Hybrid retails for $695.00 at BSW.

The Recorder

I’ll be frank:In a studio environment I’m not a fan of using a small, handheld digital recorder. I’m aware of what’s being recommended by the experts, mainly models by Edirol and Roland. Of course these devices are perfectly capable and well suited for remote recording, ENG, and video production. I prefer a dedicated rack mounted component, just like the Marantz PMD-570 currently living in my rack.

The Marantz piece that I own has an interesting feature: Besides PCM and MP3 recording, the unit can record directly to MP2 (MPEG-1, Layer II) on the fly. This is the file format that I use to exchange large files with clients. Basically the clients will convert lossless files (WAV, AIFF) to MP2 prior to uploading to my FTP server. In doing so the file is reduced in size by approximately 70%. The key is when I take delivery and decode … most, if not all of the audible fidelity is retained. Needless to say MP2 is a viable intermediate file format and it is still used today in professional broadcast workflows.

Again it’s time for something new. For this Podcasting System I’m going with the Tascam SS-R200 Solid State Recorder.

recorder

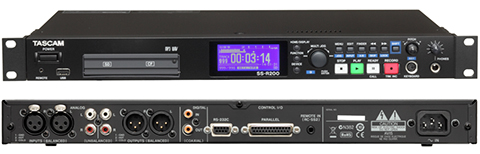
The SS-R200 will accept Compact Flash and SD/SDHC Memory cards as well as USB Flash Drives. The device will also accept a USB keyboard that can be used for metadata editing. Supported file formats are WAV and MP3 @ 44.1/48kHz. I/O is flexible and includes XLR balanced input/output, RCA unbalanced, and coaxial S/PDIF digital. There are additional I/O support options for RS-232C and Parallel Control for external device interfacing. The display is clear, and the transport buttons are large and easily accessible.

One slight issue with the recorder – I don’t believe you can connect it directly to a computer via USB (My Marantz supports this). Of course the work around is to use USB Flash drives for recording. Compact Flash and SD/SDHC recording will require an additional device for computer interfacing. Currently the Tascam SS-R200 recorder retails for $549.00 at BSW.

The Cost

Time to tally up:

Audioarts Air-1 Console: $1,789.00
Wheatstone M-1 Processor: $799.00
Telefunken M82 Mic Kit: $499.00
Telos Hx1 Hybrid: $695.00
Tascam CF Recorder: $549.00

Total: $4,331.00 (not including applicable tax and shipping)

There you have it. Like I said this is far from a budget solution. And surely I’m not suggesting that you need to spend this kind of cash to record Podcasts. However for the serious producer with appropriate technical skills and a revenue stream, this is not unattainable. As far as me personally – at this time this system is not in my immediate plans. But you never know. I’ve always wanted to replace my mixer with a Broadcast Console, so contemplation will continue …

Notes

I’ve purposely refrained from recommending accessories including cables and headphones. And regarding headphones, after years of wearing them for hours upon hours, I’ve moved over to a moderately priced set of Shure SE215 Earphones.

Full sized headphones can be very uncomfortable when worn for extended periods of time, hence my decision. Believe me it was a major adjustment. These Shure’s are not considered a high-end option. However they do serve the purpose. Isolation is good and sound quality is perfectly suitable for dialogue editing. And I’m much more comfortable wearing them. I still use my Beyer Dynamics, AKG’s, and Sony’s for critical monitoring when necessary.

And I’ve also refrained from recommending software solutions like DAWS and plugins. This would be the source of yet another installment. However I will make one recommendation. If you are serious about high quality sound and often deal with problematic audio, you need to seriously consider RX3 Advanced by iZotope.

rx3

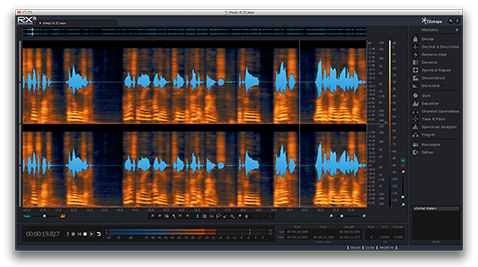
In my work this package is simply indispensable. I’m not going to get into the specifics. I will say that the Broadband DeNoiser, the Dialog Denoise Module, and the Dereverb features are simply spectacular. Indeed it’s an expensive package. I’m grateful that I have it, and it’s highly recommended.

And lastly, storage. Since all components are rack-mountable, the obvious solution would be a 4U enclosure by Middle Atlantic or Raxxess. I would also suggest a 1 Space Vent Panel installed between the Processor and the Hybrid. And if it’s convenient the Console can be placed on top of the enclosure due to it’s relatively small footprint.

One final note:I have no formal affiliation with BSW. I simply pointed to their listings due to price and availability.

-paul.

Internet Audio: True Peak Compliance …

Wide variations in average (Program/Integrated) Loudness are common across all forms of audio distributed on the internet. This includes audio Podcasts, Videocasts, and Streaming Media. This is due to the total lack of any standardized guidelines in the space. Need proof? Head over to Twit.tv and listen to a few minutes of any one of their programs. Use headphones, and set your playback volume to a comfortable level.

Now head over to PodcastAnswerMan.com, and without making any change to your playback volume – listen to the latest program.

I rest my case.

In fact, there is a 10 LU difference in average loudness between the two. Twit.tv programs check in at approximately -22 LUFS. PodcastAnswerMan checks in at approximately -12 LUFS. I find this astonishing, but I am not surprised. I’m not signaling them out for any lack of quality issues or anything like that. In my view both networks do a great job, and my guess is they have sizable audiences. Both shows are well produced and it simply makes sense to compare them in this case study.

With all this in mind let me stress that at this particular time I am not going to focus on discussing Program Loudness variations or any potential suggested standard. I can assure you this is coming! I will say that I advocate -16.0 LUFS (Program/Integrated Loudness) for all media formats distributed on the internet. Stay tuned for more on this. For now I would like to discuss True Peak compliance that will be a vital part of any recommended distribution standard.

What surprises me more than Program Loudness inconsistency is just how many producers are pushing files with clipped, distorted audio. In many cases Intersample Peaks are present in audio files that have been normalized to 0 dBFS. (For more information on Intersample Peaks please refer to this brief explanation). Producers need to correct this problem before their audio is distributed.

The Tools

One of the most useful features included in Adobe Audition is the Match Volume Processor. This tool includes various options that allow the operator to “dial in” specific average loudness and peak amplitude targets. After processing, the operator can examine the results by using Audition’s Amplitude Statistics analysis to check for accuracy.

mvp-1

Notice in the snapshot above I set the processor to Match To: Total RMS, with a -18.50 dB RMS average target. I’ve also selected the Use Limiting option. I’m able to dial in custom Look-Ahead and Release Time parameters as I see fit. Is there something missing? Indeed there is. Any time you push average levels you run the risk of clipping the source. In Audition the Match Volume/Use Limiting option lacks the capability for the operator to set a specific Peak Amplitude Ceiling. I’ve determined that in certain situations Peak Amplitudes reach a -0.1 dB ceiling resulting in possible clipped samples and True Peak levels that exceeded 0dBFS. Keep in mind this is not always the case. The results depend on the Dynamic Range and available Headroom of any source.

So how do we handle it?

Notice above the Match Volume Processor offers two Peak Amplitude options: Peak Amplitude and True Peak Amplitude. The European Broadcasting Union’s EBU R128 spec. dictates -1.0 dBTP (True Peak) as the ultimate ceiling to meet compliance. Here in the states ATSC A/85 dictates -2.0 dBTP. Since most, if not all audio formats distributed on the internet are delivered in lossy formats, it is important to pay close attention to True Peak Amplitude for both source (lossless) and distribution (lossy) files.

fgm

I advocate -1.0 dBTP as the standard for internet based audio file delivery. True Peak Limiters are able to detect and alleviate the possibility of Intersample Peaks from occurring. It is recommended to pass audio through a True Peak compliant limiter after loudness normalization and prior to lossy encoding. Options include ISL by Nugen Audio, Elixir by Flux, and (the best kept secret out there) TB Barricade by ToneBoosters. If you are running Audition, Match To: True Peak Amplitude and you should be all set.

The plugin developers mentioned above as well as Waves, MeterPlugs, tc electronic, Grimm Audio, and iZotope supply Loudness Meters and toolsets that display all aspects of loudness specifications including True Peak alerts. Visit this page for a list of supported Loudness Meters.

If True Peak detection and compliance is not within your reach due to the lack of capable tools, a slightly more aggressive ceiling (-1.5 dBFS) is recommended for Peak Normalization. The additional .5 dB acts as a sort of safety net, insuring maximum peak amplitude remains at or below -1.0 dBFS. One thing to keep in mind … performing Peak Amplitude Normalization after Loudness Normalization may very well result in a reduction in average, program loudness. Once again changes to the processed audio will depend on the audio attributes prior to Peak Normalizing.

Below I’ve supplied data that supports what I noted above. The table displays three iterations of a test file: Input, Loudness Normalized Intermediate, and final Output. For this test I used the ITU-R BS.1770-2 “Match To” option in Audition’s Match Volume Processor. I pushed the average target to -16.0 LUFS. As noted, this is the target that I advocate for internet and/or mobile audio. This target is +7 LU hotter than R128 and +8 LU hotter than ATSC A/85.

After processing the Input file, the average target was met in the Intermediate file, but True Peak overs occurred. The Intermediate file was then passed through a compliant True Peak Limiter with it’s ceiling set to -1.0 dBTP. Compliance was met in the Output with a minimal reduction in Program Loudness.

data-480

Producers: there is absolutely no excuse if your audio contains distortion due to clipping! At the very least you should Peak Normalize to -1.5 dBFS prior to encoding your lossy MP3. Every audio application on the planet offers the option to Peak Normalize, including GarageBand and Audacity. Best case scenario is to adopt True Peak compliance and learn how to use the tools that are necessary to get it done. If you are an experienced producer or professional, and you come across content that does not comply – reach out and offer guidance.

-paul.

Intersample Peaks, Normalization, and Limiting …

When preparing to encode MP3 files we need to be aware of the possibility of Intersample Peaks (ISP) that may be introduced in the output, especially when targeting low bit rates. This results from the filtering present in lossy encoding. We alleviate this risk by leaving at least 1 dB of headroom below 0dBFS.

Producers should peak normalize source files slated for MP3 encoding to nothing higher than -1.0 dBFS. In fact I may suggest lowering your ceiling further to -1.5 dBFS sometime in the future. Let me stress that I’m referring to Peak Normalization and not Loudness Normalization. Peak Normalizing to a specific level will limit audio peaks when and if the signal reaches a user defined ceiling. It is possible to set a digital ceiling when performing Loudness Normalization as well. This is a topic for a future blog post.

Notice the ISP in this image lifted from an MP3 wave form. The original source file was peak normalized to -0.1 dBFS and exhibited no signs of clipping.

You can also avoid ISP’s by using a compliant ITU Limiter and setting the ceiling accordingly. During source file encoding this type of limiter will detect when ISP’s may occur in the encoded MP3.

For podcast and internet audio, a limiter set to a standardized ceiling of -1.0/-1.5 dBFS works well and is recommended.

-paul.

Broadcast upTimer …

This is the updated version of a neat utility that I built about 5 years ago. Radio Stations sometime use what are referred to as upTimers to track live programs and air time. Hardware versions are available from main stream broadcast gear suppliers and can be quite expensive. In fact many of these devices can be remotely controlled using a console link. I thought a software version would be cool, so there you have it.

New options include the capability to set the timer Ceiling (60 or 90 minutes), HUD window interface, and date display. I decided to use a HUD window instead of a basic textured window. Clicking away from the running timer window does not affect clear visibility. The physical size of the window is now 840 x 365 pixels. This makes it easy to see from a distance.

I need to add the Sparkle Framework for automatic updating support before I release it …

-paul.

Update:

I replaced the current date with a Running Time display. Sparkle has been added as well …

You can download upTimer 2.0 here.