The vast majority of Podcast producers are not using multi- thousand dollar Neumann mics and/or highly efficient preamps in acoustically treated environments …
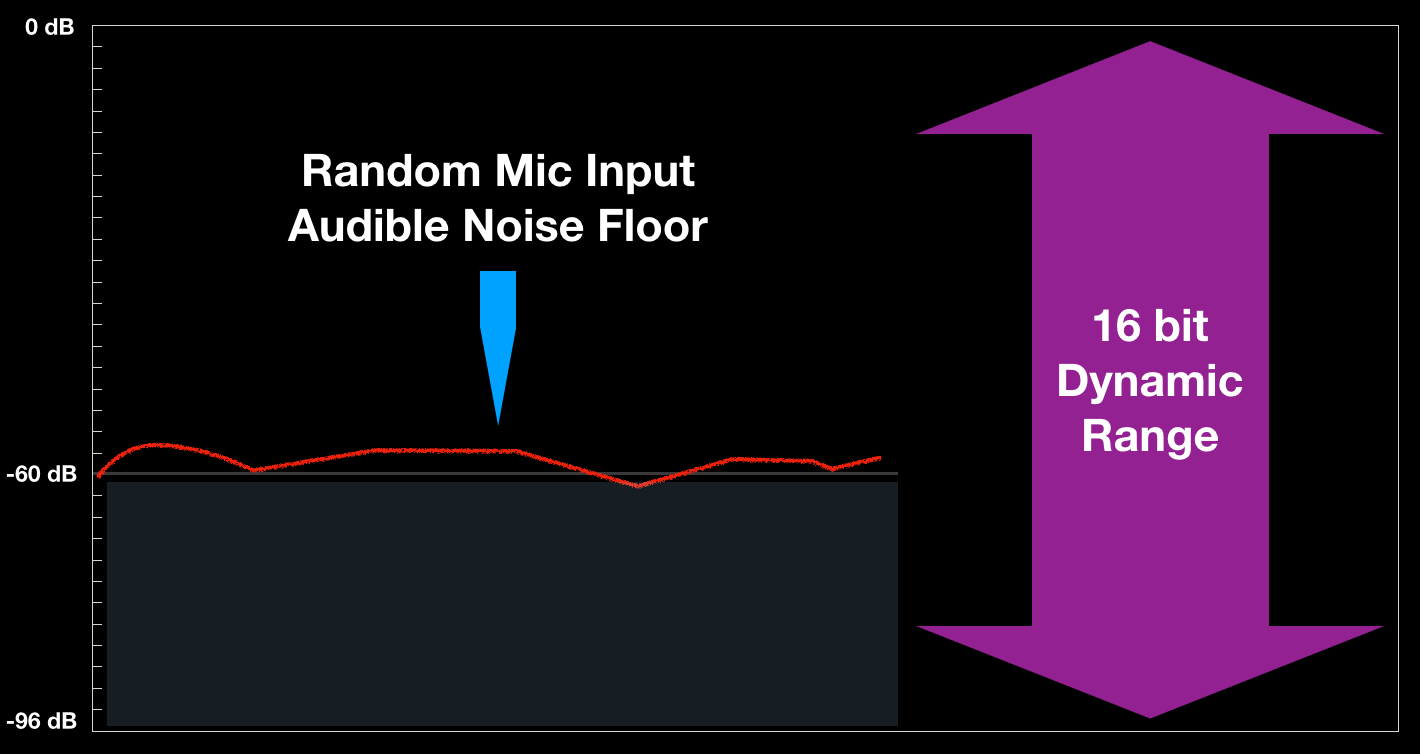
When recording (spoken word) audio via mic input, the noise floor is perceived as the level of ambient noise and residual preamp noise – NOT the system noise. Any such mic input will exhibit a higher perceived noise floor with a reduced SNR compared to a much more efficient DI or electronic instrument.
Consider the quantified theoretical dynamic range of 16 bit audio (96 dB). When recording with a mic in a typical environment – your system is incapable of effectively utilizing the full dynamic range of 16 bit audio due to the noted (elevated) perceived noise.
When producing Podcast audio, wide dynamics capabilities are irrelevant. In fact persistent wide dynamics in spoken word audio intended for Internet/Mobile/Podcast distribution will compromise intelligibility.
With all this in mind, what is the advantage of recording 24 bit (spoken word) Podcast audio with a theoretical dynamic range of 144 dB vs.16 bit audio? In my view there is no advantage, especially when proper down conversion techniques such as Dithering are for the most part ignored. An omission as such will compromise the sonic attributes of down converted audio derived from higher resolution source masters.
Are you striving for an efficient Podcast production workflow with excellent fidelity and adequate frequency response? 44.1 kHz (or 48 kHz) • 16 bit audio will be sufficient. Of course there will be optimization variables and requirements such as quality of gear, optimal recording levels, and ample headroom.
Notes:
– If you are producing highly dynamic episodic dramas, fine arts content, or complex narratives with music and sound effects elements – and you prefer to work with 24 bit media … by all means do so.
– When down converting from 24 bit to 16 bit in preparation for distribution, recognize the significance of Dithering.
– Be aware of MP3 codec filtering attributes, inherent frequency response limitations, artifacts, and the consequences of low bit rate encoding.
– Applying a low-pass filter to lossless audio prior to lossy encoding is recommended. Such a roll-off will effectively supply the lossy encoder with managed high frequency activity that is below the codec’s filtering threshold.
Below I’ve listed a few Adobe Audition CC (ver.2015.2.1) features/options that may be obscure and perhaps underutilized.
Usability
1- Maximize Active Frame (⌘↓). This command toggles full screen display accessibility of the active (blue outlined) UI Panel.
2- Lock In Time (Multitrack). When activated, selected clips are pinned to their current location. I mapped ⌥⌘L for this function.
3- Group (⌘G) (Multitrack). Multiple clips will be congregated and may be repositioned cumulatively.
4- Suspend Groups (⏎⌘G) (Multitrack). This function temporarily deactivates the Group. Actually, this command toggles the behavior between deactivate and activate. There are also options to Remove Focus Clip from Group and Ungroup Selected Clips. They both support custom shortcut mapping,
5- Right + Click on any Clip’s Fade Handle (Multitrack) to display the following customization menu:
– No Fade
– Fade In/Out
– Crossfade
– Symmetrical
– Asymmetrical
– Linear
– Cosine
– Automatic Crossfade Enabled
6- Bounce to New Track (Multitrack). This feature will process and combine multiple clips located on a single track or multiple tracks. This will free up system resources. The following options support custom shortcut mapping:
– Selected Track
– Time Selection
– Selected Clips In Time Selection
– Selected Clips Only
7- Convert To Unique Copy (Multitrack). This function creates a sub clip derived from the original trimmed source clip. Media Handles are no longer accessible in the converted copy (Multitrack and/or Waveform Editor environments). I mapped ⌥⌘C for this function.
Editing
1- Time Selection in all Tracks (Multitrack). This is a Ripple Delete variation (⏎⌘⌦) that will retain clip relevant Marker position(s).
2- Split All Clips Under Playhead (Multitrack). I mapped ⌥⌘R for this function.
3- Merge Clips (remove thru edits) (Multitrack). I mapped ⌥⌘J for this function.
Mixer/Track Inserts and Sends
1- Individual Track supplied buttons will designate Sends and Inserts as Pre or Post Fader.
Markers
1- Markers implemented in the Waveform Editor may be Merged thus allowing easy selection of encapsulated audio.
2- Selected Range Markers present in the Waveform Editor may be exported as individual clips.
3- Selected Range Markers present in the Waveform Editor may be added to a Playlist where they may be reordered for auditioning.
Exporting
1- The (Multitrack) Session Export Dialog includes user defined Mixdown options:
– Master: Stereo, Mono, or 5.1
– Signal present on individual Tracks
– Signal present on individual Busses
2- Export with Adobe Media Encoder (Multitrack). This Export option runs Media Encoder and requires the user to select a predefined Media Encoder preset. Routing options are available as well.
I’d like to share my observations and views on the recently published AES Technical Document AES TD1004.1.15-10 that specifics best practices for Loudness of Audio Streaming and Network File Playback.
The document is a collection of Loudness processing guidelines for diverse platform dependent media streaming and downloading. This would include music, spoken word, and possible high dynamic audio in video streams. The document credits some of the most well respected industry leading professionals, including Bob Katz, Thomas Lund, and Florian Camerer. The term “Podcast” is directly referenced once in the document, where the author(s) state:
“Network file playback is on-demand download of complete programs from the network, such as podcasts.”
I support the purpose of this document, and I understand the stated recommendations will most likely evolve. However in my view the guidelines have the potential to create a fair amount of confusion for producers of spoken word content, mainly Podcast producers. I’m specifically referring to the suggested 4 LU range (-16.0 to -20.0 LUFS) of acceptable Integrated Loudness Targets and the solutions for proper targeting.
Indeed compliance within this range will moderately curtail perceptual loudness disparities across a wide range of programs. However the leniency of this range is what concerns me.
I am all for what I refer to as reasonable deviation or “wiggle room” in regard to Integrated Loudness Target flexibility for Podcasts. However IMHO a -20 LUFS spoken word Podcast approaches the broadcast Loudness Targets that I feel are inadequate for this particular platform. A comparable audio segment with wide dynamics will complicate matters further.
I also question the notion (as stated in the document) of purposely precipitating clipping when adding gain “to handle excessive peaks.”
And there is no mention of the perceptual disparities between Mono and Stereo files Loudness Normalized to the same Integrated Loudness Target. For the record I don’t support mono file distribution. However this file format is prevalent in the space.
Perspective
I feel the document’s perspective is somewhat slanted towards platform dependent music streaming and preservation of musical dynamics. In this category, broad guidelines are for the most part acceptable. This is due to the wide range of production techniques and delivery methods used on a per musical genre basis. Conversely spoken word driven audio is not nearly as artistically diverse. Considering how and where most Podcasts are consumed, intelligibility is imperative. In my view they require much more stringent guidelines.
It’s important to note streaming services and radio stations have the capability to implement global Loudness Normalization. This frees content creators from any compliance responsibilities. All submitted media will be adjusted accordingly (turned up or turned down) in order to meet the intended distribution Target(s). This will result in consistency across the noted platform.
Unfortunately this is not the case in the now ubiquitous Podcasting space. At the time of this writing I am not aware of a single Podcast Network that (A) implements global Loudness Normalization … and/or … (B) specifies a requirement for Integrated Loudness and Maximum True Peak Targets for submitted media.
Currently Podcast Loudness compliance Targets are resolved by each individual producer. This is the root cause of wide perceptual loudness disparities across all programs in the space. In my view suggesting a diverse range of acceptable Targets especially for spoken word may further impede any attempts to establish consistency and standardization.
PLR and Retention of Music Dynamics
The document states: “Users may choose a Target Loudness that is lower than the -16.0 LUFS maximum, e.g., -18.0 LUFS, to better suit the dynamic characteristics of the program. The lower Target Loudness helps improve sound quality by permitting the programs to have a higher Peak to Loudness Ratio (PLR) without excessive peak limiting.”
The PLR correlates with headroom and dynamic range. It is the difference between the average Loudness and maximum amplitude. For example a piece of audio Loudness Normalized to -16.0 LUFS with a Maximum True Peak of -1 dBTP reveals a PLR of 15. As the Integrated Loudness Target is lowered, the PLR increases indicating additional headroom and wider dynamics.
In essence low Integrated Loudness Targets will help preserve dynamic range and natural fidelity. This approach is great for music production and streaming, and I support it. However in my view this may not be a viable solution for spoken word distribution, especially considering potential device gain deficiencies and ubiquitous consumption habits carried out in problematic environments. In fact in this particular scenario a moderately reduced dynamic range will improve spoken word intelligibility.
Recommended Processing Options and Limiting
If a piece of audio is measured in it’s entirety and the Integrated Loudness is higher than the intended Target, a subtractive gain offset normalizes the audio. For example if the audio checks in at -18.0 LUFS and you are targeting -20.0 LUFS, we simply subtract 2 dB of gain to meet compliance.
Conversely when the measured Integrated Loudness is lower than the intended Target, Loudness Normalization is much more complex. For example if the audio checks in at -20.0 LUFS, and the Integrated Loudness Target is -16.0 LUFS, a significant amount of gain must be added. In doing so the additional gain may very well cause overshoots, not only above the Maximum True Peak Target, but well above 0dBFS. Inevitably clipping will occur. From my perspective this would clearly indicate the audio needs to be remixed or remastered prior to Loudness Normalization.
Under these circumstances I would be inclined to reestablish headroom by applying dynamic range compression. This approach will certainly curtail the need for aggressive limiting. As stated the reduced dynamic range may also improve spoken word intelligibility. I’m certainly not suggesting aggressive hyper-compression. The amount of dynamic range reduction is of course subjective. Let me also stress this technique may not be suitable for certain types of music.
Additional Document Recommendations and Efficiency
The authors of the document go on to share some very interesting suggestions in regard to effective Loudness Normalization:
1) “If level has to be raised, raise until it reaches Target level or until True Peak reaches 0 dBTP, whichever occurs first. Thus, the sound quality will be preserved, without introducing excessive peak limiting.”
2) “Perform what is noted in example 1, but keep raising the level until the program level reaches Target, and apply either peak limiting or allow some clipping to handle excessive peaks. The advantage is more consistent loudness in the stream, but this is a potential sonic compromise compared to example 1. The best way to retain sound quality and have more consistent loudness is by applying example 1 and implementing a lower Target.”
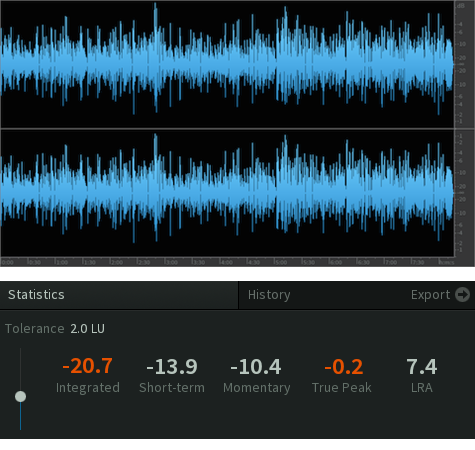
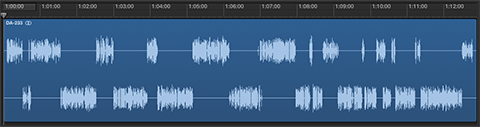
With these points in mind, please review/demo the following spoken word audio segment. In my opinion the audio in it’s current state is not optimized for Podcast distribution. It’s simply too low in terms of perceptual loudness and too dynamic for effective Loudness Normalization, especially if targeting -16.0 LUFS. Due to these attributes suggestion 1 above is clearly not an option. In fact neither is option 2. There is simply no available headroom to effectively add gain without driving the level well above full scale. Peak limiting is unavoidable.
I feel the document suggestions for the segment above are simply not viable, especially in my world where I will continue to recommend -16.0 LUFS as the recommended Target for spoken word Podcasts. Targeting -18.0 LUFS as opposed to -16.0 LUFS is certainly an option. It’s clear peak limiting will still be necessary.
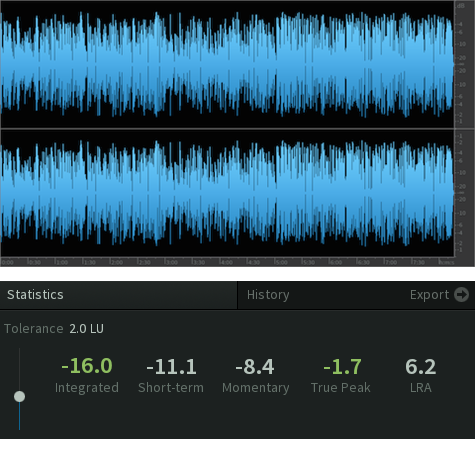
Below is the same audio segment with dynamic range compression applied before Loudness Normalization to -16.0 LUFS. Notice there is no indication of aggressive limiting, even with a Maximum True Peak of -1.7 dBTP.
Regarding peak limiting the referenced document includes a few considerations. For example: “Instead of deciding on 2 dB of peak limiting, a combination of a -1 dBTP peak limiter threshold with an overall attenuation of 1 dB from the previously chosen Target may produce a more desirable result.”
This modification is adequate. However the general concept continues to suggest the acceptance of flexible Targets for spoken word. This may impede perceptual consistency across multiple programs within a given network.
Conclusion
The flexible best practices suggested in the AES document are 100% valid for music producers and diverse distribution platforms. However in my opinion this level of flexibility may not be well suited for spoken word audio processing and distribution.
I’m willing to support the curtailment of heavy peak limiting when attempting to normalize spoken word audio (especially to -16.0 LUFS) by slightly reducing the intended Integrated Loudness Target … but not by much. I will only consider doing so if and when my personal optimization methods prior to normalization yield unsatisfactory results.
My recommendation for Podcast producers would be to continue to target -16.0 LUFS for stereo files and -19.0 LUFS for mono files. If heavy limiting occurs, consider remixing or remastering with reduced dynamics. If optimization is unsuccessful, consider lowering the intended Integrated Loudness Target by no more than 2 LU.
A True Peak Maximum of <= -1.0 dBTP is fine. I will continue to suggest -1.5 dBTP for lossless files prior to lossy encoding. This will help ensure compliance in encoded lossy files. What’s crucial here is a full understanding of how lossy, low bit rate coders will overshoot peaks. This is relevant due to the ubiquitous (and not necessarily recommended) use of 64kbps for mono Podcast audio files.
Let me finish by stating the observations and recommendations expressed in this article reflect my own personal subjective opinions based on 11 years of experience working with spoken word audio distributed on the Internet and Mobile platforms. Please fell free to draw your own conclusions and implement the techniques that work best for you.
If you are in the audio production business or involved in some sort of collaborative Podcast effort, moving large lossless audio files to and from various locations can be challenging.
Slow internet speeds, Hotel WiFi, and server bottlenecks have the potential to cripple efficient file management and ultimately impede timely delivery. And let’s not forget how quickly drive space can diminish when storing WAV and/or AIFF files for archival purposes.
The Requirements for a Suitable Intermediate
From the perspective of a Spoken Word New Media Producer, there are two requirements for Intermediate files: Size Reduction and Retention of Fidelity. The benefits of file size reduction are obvious. File transfers originating from locations with less than ideal connectivity would be much more efficient, and the consumption of local or remote disk/server space would be minimized. The key here is to use a flexible lossy codec that will reduce file sizes AND hold up well throughout various stages of encoding and decoding.
Consider the possible benefits of the following client/producer relationship: A client converts (encodes) lossless files to lossy and delivers the files to the producer via FTP, DropBox, etc. The Producer would then decode the files back to their original format in preparation for post production.
When the work is completed, the distribution file is created and delivered (in most cases) as an MP3. Finally with a bit of ingenuity, the producer can determine what needs to be retained for archival purposes, and convert these files back to the intermediate format for long term storage.
How about this scenario: Podcast Producer A is located in L.A.. Producer B is located in NYC. Producer B handles the audio post for a double-ender that will consist of 2 individual WAV files recorded locally at each location.
Upon completion of a session, the person in L.A must send the NY based audio producer a copy of the recorded lossless audio. The weekly published program typically runs upwards of 60 minutes. Needless to say the lossless files will be huge. Let’s hope the sender is not in a Hotel room or at Starbucks.
The good news is such a codec exists …
MPEG 1 Layer II (commonly referred to as MP2 with an .mp2 file extension) is in fact a lossy “perceptual” codec. What makes it so unique (by design) is the format’s ability to limit the introduction of artifacts throughout various stages of encoding and decoding. And get this – MP2’s check in at about 1/5th the size of a lossless source. For example a 30 minute (16 bit/44.1kHz) Stereo WAV file currently residing on my desktop is 323.5 megabytes. It’s MP2 counterpart is 58.7 megabytes.
Public Radio
If you look into the file submission requirements over at PRX (The Public Radio Exchange) and NPR (see requirements), you will notice MP2 audio files are what they ask for.
In fact during the early days of IT Conversations, founder and Executive Director Doug Kaye implemented the use of MP2 audio files as intermediates throughout the entire network based on recommendations by some of the most prominent engineers in the Public Radio space. We expected our show producers and content providers to convert their audio files to MP2 prior to submission to our servers using third party software applications.
Eventually a proprietary piece of software (encoder/uploader) was developed and distributed to our affilates. The server side MP2’s were downloaded by our audio engineers, decoded to lossless, produced, and then sent back up to the network as MP2 in preparation for server side distribution encoding (MP3).
From a personal perspective I was so impressed with the codec’s performance, I immediatly began to ask my clients to submit MP2 audio files to me, and I’ve never looked back. I have never experienced a noticeable degradation of audio quality when converting a client’s MP2 back to WAV in preparation for post.
Storage
In my view it’s always a good idea to have unfettered access to all previously produced project files. Besides produced masters, let’s not forget the accumulation of individual project assets that were edited, saved, and mixed in post.
On average my project folders that include audio assets for a 30 minute program may consume upwards of 3 Gigabytes of storage space. Needless to say an efficient method of storage is imperative.
Fidelity Retention
If you are concerned about the possibility of audio quality degradation due to compression artifacts, well that’s understandable. In certain instances accessability to raw, uncompressed audio will be more suitable. However I am convinced that you will be impressed with how well MP2 audio files hold up throughout various workflows.
In fact try this: (Suggested encoders listed below)
Convert a stereo WAV file to stereo MP2 (256 kbps). Compare the file sizes. Listen to the MP2 and assess fidelity retention. Then convert the stereo MP2 directly to stereo MP3 (128 kbps). Listen for any indication of noticeable artifacts.
Let me know what you think …
My recommendation would be to first experiment with converting a few of your completed project assets to MP2 in preparation for storage. I’ve found that I rarely need to dig back into old work. I have on a few occasions, and the decoded MP2’s were perfectly fine. Note that I always save a copy of the produced lossless master.
There are many audio applications that support MP2 encoding. Since I have limited exposure to Windows based software, the scope of my awareness is narrow. I do know that Adobe Audition supports the format. In the past I’ve heard that dBPowerAmp is a suitable option.
On the Mac side, besides the cross platform Audition – there is a handy utility on the Mac App Store called Audio-Converter. It’s practically free, priced at $0.99. File encoding is also supported in FFmpeg either from the Command Line or through various third party front ends.
Here is the syntax (stereo, then mono) for Command Line use on a Mac. The converted file will land on your Desktop, named Output.mp2:
Many modern media applications support native playback of MP2 audio files, including iTunes and Quicktime.
In Conclusion
If you are in the business of moving around large Spoken Word audio files, or if you are struggling with disk space consumption issues, the use of MP2 audio files as intermediates is a worthy solution.
I’ve released my Cinemascope Toolkit. The package includes a basic 2.35:1 matte (“Cinemascope Crop”) created in Motion and wrapped in a FCP X Effect. The Effect supports video Scale control and X/Y positioning. I’ve also included four Compressor Presets that output cropped MPEG-4/H.264 videos. Frame things up in FCP X and output using one of the presets for 2.35:1 aspect ratios.
The Installer is hard coded in Objective-C. All asset routing will be handled automatically when you run the installer. The Effect will be installed in a Matte Category under a Widescreen Theme in the FCP X Effects Browser. The Compressor Presets will be located in the Settings window under the Custom/CinemaScope Presets – Settings Group.
You can edit whatever is defined by the installer. For example I did not edit the naming convention that I use for my Compressor Presets. They all begin with the first four letters of my name. And of course the preset parameters can be edited to suit your needs.
You can customize the FCP Category and Theme as well. After installing the toolkit – pull the Cinemascope Crop folder out of the ~/Movies/Motion Templates/Effects/Mattes folder. Use my toMotion application to customize.
When preparing to encode MP3 files we need to be aware of the possibility of Intersample Peaks (ISP) that may be introduced in the output, especially when targeting low bit rates. This results from the filtering present in lossy encoding. We alleviate this risk by leaving at least 1 dB of headroom below 0dBFS.
Producers should peak normalize source files slated for MP3 encoding to nothing higher than -1.0 dBFS. In fact I may suggest lowering your ceiling further to -1.5 dBFS sometime in the future. Let me stress that I’m referring to Peak Normalization and not Loudness Normalization. Peak Normalizing to a specific level will limit audio peaks when and if the signal reaches a user defined ceiling. It is possible to set a digital ceiling when performing Loudness Normalization as well. This is a topic for a future blog post.
Notice the ISP in this image lifted from an MP3 wave form. The original source file was peak normalized to -0.1 dBFS and exhibited no signs of clipping.
You can also avoid ISP’s by using a compliant ITU Limiter and setting the ceiling accordingly. During source file encoding this type of limiter will detect when ISP’s may occur in the encoded MP3.
For podcast and internet audio, a limiter set to a standardized ceiling of -1.0/-1.5 dBFS works well and is recommended.
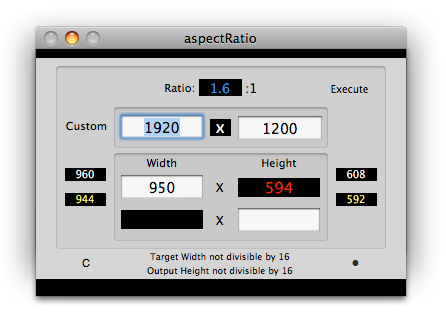
Here is a glimpse of what I have planned for the next release for aspectRatio:
At this point I’ve implemented a suggested dimensions method that displays values evenly divisible by 16. The results are triggered by the Target Width and returned Output Height calculation.
Select MPEG formats are based on 16×16 macro-blocks. Evenly divisible (by 16) output dimensions will maximize the efficiency of the encoder and yield optimum results. For example: a purist would prefer a small 16:9 distribution video to be 480×272 instead of the common 480×270
Also included in this release: a user defined output font color preference setting [orange/red], and a Menu option that re-opens the main UI window if the user inadvertently closes it while the application is still running.