Final Cut Pro Offline Edit with ProRes Proxy…

It has been documented that the newly released feature film “Eat Pray Love” staring Julia Roberts was edited entirely on a Final Cut Pro workstation.

I found this most interesting:

“The editors found an efficient solution in ProRes 422 (Proxy), a new version of the Apple ProRes codec introduced with Final Cut Pro 7. As soon as dailies arrived from EFILM, Assistant Editor Doc Crotzer would transcode the files from ProRes 422 (HQ) to ProRes 422 (Proxy), organize the footage into bins, and prepare the material for editing.”


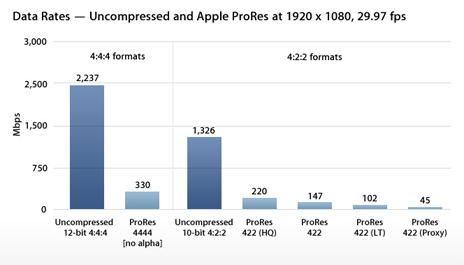
Review this chart, and notice the variations in data rates of the ProRes family of codecs:


Obviously lower data rates = smaller file sizes. The bottom line is working with ProRes Proxy files (Offline copies of original ProRes 422/HQ files) creates a much more efficient workflow that is less taxing on any system.

I’ve adopted a slick method using my iMac for rough cutting ingested AVCHD footage that has been transcoded to ProRes Proxy via Final Cut Pro’s Log and Transfer. Depending on the complexity of the finished project sequence, I can finish and output on the iMac, or – move the project and it’s assets over to my MacPro for finishing. The key is prior to outputting, the edited Proxy clips can be re-captured and replaced with higher quality ProRes versions.


The Workflow:

  • Set up the FCP Project and Sequence. My sequences are typically 1080p/24.
  • Add a new Bin in the FCP Browser and designate it as the Logging Bin.
  • Mount media and run Log and Transfer. From the Import Preferences Action Popup menu, set ProRes Proxy as the ingest transcode format.
  • Log and Transfer clips into the project. Before closing Log and Transfer, reset the ingest transcode format to ProRes 422.
  • Close Log and Transfer and edit clips into sequence.

  • Reconnect Media

  • Select the project sequence in the Browser. From the FCP menu, run Media Manager: File/Media Manager. Create an Offline Sequence and set to ProRes 422.


  • Name and save the new Sequence. A new tab will appear in the FCP Browser that includes the duplicate sequence and it’s offline clips.
  • Select the new sequence. From the FCP Menu: File/Batch Capture.
  • Choose All Offline Items in Selection from the displayed Re-Import popup menu. Log and Transfer will run and recapture the sequence clips as ProRes 422 versions.
  • Finish and output.
  • If you edit on an iMac, a Mac Portable with an external FW800 hard drive, or if you are looking for a more efficient large-scale project workflow – try this method. It works well for me …

    -ptfigg.
    Final Cut Pro:Timecode Generator

    Let’s assume you are finishing up a rough edit for client review consisting of multiple clips and sound. The client requests visible timecode in the review movie. Final Cut Pro includes a Timecode Generator Filter located in Effects/Video Filters/Video. Since this is in fact a filter, it must be applied to each individual clip. The problem with this implementation? The TC Generator will reset on a clip to clip basis as the playhead moves through the sequence.
    Our objective is to have the TC Generator display a continuous representation of the entire sequence timecode. I have two suggestions …

    Nesting

    The image below represents a Nested sequence:

    fcpNest.jpg

    The original sequence consisted of multiple independent clips. Nesting a selection of timeline assets creates a new self contained sequence without any reference to previous edit points.

    To create a Nested Sequence, select the timeline assets. Head up to the FCP Sequence Menu and select Nest Item(s). You can also use the keyboard shortcut ⌥ C. Apply the FCP Timecode Generator Filter to the Nest. The filter will display the RT playback timecode in the Canvas. The Timecode will be visible in the output movie.

    fcpCanvas.jpg

    Andy’s Timecode Generator

    There is another way to do this using a (free) third party generator. Andy’s TC Generator allows you to add a TC Generator directly to your existing sequence as an overlay on a upper video track. The developer notes that you can adjust the offset to match your sequence, or use it as it’s own free running reference. Very cool.

    One final note about one of Final Cut Pro’s newest features: The Timecode Viewer HUD.

    tcHUD.jpg

    The resizable Timecode Viewer (Tools/Timecode Viewer or press Control-T) makes reading current timecode very easy. The Timecode Viewer displays the timecode for either the Timeline/Canvas or the Viewer as well as the corresponding sequence name or clip name. You can customize what is displayed by right-clicking either the upper or lower display areas of the HUD.

    Tip: for easy access, add a Timecode Viewer Shortcut Button to a Button Bar in the FCP window of choice – (Tools/Button List/Timecode Viewer).

    -paul.

    Technorati Tags:
    , , ,

    ProRes Proxy …

    It’s been two weeks since I installed Final Cut Studio (3).

    I spend most of my time working in Soundtrack Pro 3, and I’m happy with the new features. Most notably, RMS Normalization, Voice Level Matching, the “Enhanced” File Editor”, and a few additional editing features within Multitrack Projects (trim in point to playhead/trim out point to playhead, for example).

    Final Cut Pro: I’m happy that apple finally added a customizable Timecode HUD, improved clip Speed Controls, and enhanced the process of Exporting work. Upon release of the suite the professional user base was up in arms with regard to the absence of dedicated support for Blu-ray authoring in DVD Studio Pro. However there is now a nifty (but limited) Blu-ray export option available from within Final Cut. Authoring templates are fairly basic, and of course a supported Blu-ray drive is necessary. So far this new feature has been well received. Incidentally, I heard from a reliable source that apple’s FC Studio Product Manager stated that “DVD Studio Pro is designed to author standard definition DVD’s.” Does this mean we will never see embedded Blu-ray support in DVDSP? Time will tell.

    prores_prores_icon20090722.jpg

    And let’s not forget about the new additions to the ProRes Family of codecs. In fact the Proxy and LT versions of ProRes will help with my AVCHD projects and workflows in a big way. It is now possible to ingest and edit transcoded camera footage using the reduced data rate ProRes Proxy codec.

    I’ve been importing the contents of entire disc images that include the native AVCHD footage from my camera’s SDHC card and storing locally on a high capacity internal hard drive. This allows me to easily Log and Transfer multiple ProRes formats for editing, and for high quality ProRes (422 or HQ) reconnects in preparation for final output. I’ve been duplicating project edit sequences and adjusting settings accordingly prior to reconnecting to higher quality clips. This method works very well.

    As far a disappointments: I was sure that apple would implement a major Final Cut UI overhaul for version 7. This was obviously not the case. Apple’s Product Manager also noted, and again according to sources – that the FC Pro UI “just works”, and there is “no reason to change it at this particular time …”

    Anyway, as I move forward I will be spending more time working in and experimenting with Motion. I feel my Final Cut and Soundtrack Pro skills are where they need to be. Not the case with Motion.

    Notes:

    I’m now running the latest version of Final Cut Server (ver.1.5) and I have ordered a copy of Logic Express 9. I’ll be in touch…

    -ptfigg.

    Technorati Tags:
    , , , ,

    proKeys for Mac …

    Final Cut Pro, Logic, and Aperture all include searchable keyboard shortcut databases. Soundtrack Pro does not. Oddly enough I was never a keyboard shortcut power user. I find it confusing trying to remember specific shortcut banks that vary from application to application. I’m now realizing things flow much more efficiently when using various shortcuts to execute repetitive application functions.

    Enter proKeys:

    proKeys-for_pnm.jpg

    proKeys is a customizable shortcut repository. The left source list includes various (user defined) applications. Specific shortcuts are listed in a basic NSTableView with three columns: Function, Shortcut, and Category. This concept matches the PDF user manual implementation provided by apple. You can store what I refer to as “Quick Tags”, or tokenField strings that support drag and drop. Their purpose? Add and store keyboard shortcut symbols (⌘,⌥,⌦) for repetitive use. Keyword tagging is supported, and I’ve also included a Category Log that simplifies searching for and displaying an entire “bank” of shortcuts that are part of a specific group.

    I built the application using a Core Data Model with Bindings. I also implemented a custom file extension that supports SQLITE file/data format backups. The demo dbase includes the entire group of Soundtrack Pro shortcuts.

    Now I need to consider distribution. I think it’s a well designed, simple tool that many will find useful.

    More news to follow …

    -paul

    Technorati Tags:
    , ,