upTimer 3.0

I think it was in 2005. I was looking around for some sort of hardware component Timer to track Podcast recording session elapsed time. I came across an Ad in Radio Magazine sponsored by ESE. They specialize in manufacturing different types of clocks, timers, and timecode utilities intended for broadcast environments. It was their Up Timer (designed to track live programs and air time) that sparked my interest.

The device originally retailed for (I think?) $300. Functionality is straightforward: LED display – Start, Stop. Reset buttons, and a DB9 interface for remote control operation. Interestingly – it is limited to a 60 min. ceiling. Actually, it’s range was/is 00:00 – 59:59.

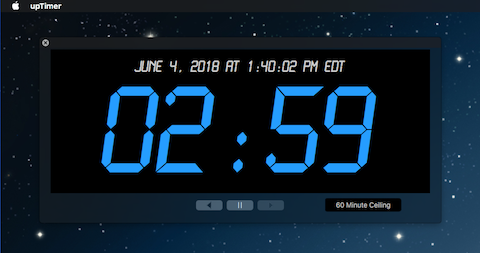
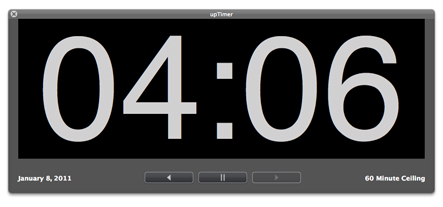
Below is a snapshot of the current (desktop) model. It retails for less than $200.

Anyway, shortly after my initial discovery of the device, I decided to build a software version for the Mac. Version 2 was released in 2011. Seven years later I am releasing Version 3.

Besides the noticeable UI redesign, the application is now 64bit.

* The ceiling is somewhat flexible, thus allowing the user to select either a 60 or 90 min. ceiling.

* The upTimer font color can be set to blue or yellow. The font color shifts to red when the elapsed time reaches the 2 min. mark relative to the defined ceiling.

* The operation keys (Reset, Stop, Start) are mapped to ←, ↓, → keyboard keys respectively.

* The application window checks in at approx. 735 x 340 pixels. I plan to add scalability to the UI sometime in the future.

Note in this version I decided to include and display a running long form Date and Time string above the upTimer. The user can hide it’s visibility, along with the linked ceiling setting indicator.

Update: Version 3.5 includes a new UI size display preference. The Large option resizes the application window by approx. 40%.

Update: Version 3.5.1 includes Application Menu actions with mapped keyboard shortcuts to toggle the display size of the UI.

Update: Version 3.5.2 mainly includes UI tweaks.

Download upTimer 3.5.2
(OSX 10.10.5 or later)

Fee? None. My only request is to please keep me in mind for expert Podcast Audio Post, audio processing, and consulting. I’ve been in the space since 2004.

-paul.

Mic Preamp Level and Gain Staging

When configuring voice processors such as the dbx 286A/s (or any other device with a similar configuration) – there is always an optimal preamp level setting or sweet spot for the connected microphone. Basically – your mic needs to be properly driven at the preamp stage in order to pass sufficient gain with low inherent noise and ample headroom throughout the device and thru it’s downstream processing modules.

In general, intra-device Drive based Compressors are designed to elevate the module input gain as the setting is increased. In doing so the dynamic range of the passing signal will be decreased. This often results in an elevation of the noise floor that was nonexistent prior to the compression stage.

Please note: After initial preamp optimization, this setting should remain static. The preamp level control should NOT be used for gain staging or compression noise floor compensation! In essence improper preamp gain will hinder the effectiveness of downstream intra-device processing.

My recommendation for optimal signal to noise: set the preamp gain accordingly. Apply intra-device processing. Lastly, use the OUTPUT gain for any necessary gain staging or compensation. This will have no effect on the initial (and hopefully optimized) mic input setting as well as the subsequent processed signal passing through the device.

-paul.

Aphex 320D Compellor

What is a Compellor? In short it is a Compressor-Leveler-Limiter. The device is specifically designed for the transparent control of audio levels.

It operates as a stereo processor or as a two-channel (mono) processor supporting independent channel control.

The device includes 3 interactive gain controllers:

– Frequency Discriminate Leveler
– Compressor
– Limiter

Additional features include a Dynamic Release Computer (DRC), Dynamic Verification Gate (DVG), and a Silence Gate.

The original device (model 300 Stereo Compellor) was released in 1984. The product line evolved and culminated in 2003 with the release of the 320D. Through the years the Compellor has been widely used in professional broadcast, post houses, recording studios, and live venues.

In 2004 I purchased a used model 320A from a radio station. The “A” reference indicates it’s analog circuitry. I’ve used the 320A for countless audio file and tape transfers, post production processing, Telephone/Skype recording sessions, and monitoring. The device provides three selectable Operating Levels … +8dBu, +4dBu, and -10dBV.

Recently the complex level and gain reduction metering for the right channel failed. I replaced the faulty 320A with a 320D. This version features digital and analog I/O with common selectable (analog) Operating Levels (+4dBu, and -10dBV).

At some point my faulty 320A will be shipped out to Burbank California for authorized service.

320D – Automatic Processing and Detection

As noted Aphex classifies the Compellor as a Frequency Discriminant Leveler. It responds slower and less aggressively to low frequencies. In essence low frequency energy will not initiate gain reduction.

A Dynamic Release Computer (DRC) instantiates program dependent compression release times.

The Dynamic Verification Gate (DVG) computes the historical average of peak values and verifies whether measured values exceed or are equal to the historical value. When the signal level is below the average, leveling and compression gain reduction is frozen.

Controls

The device Drive control sets the preprocessed VCA gain. Higher settings yield a higher level of gain reduction (VCA refers to Voltage Controlled Amplifier).

The Process Balance control allows the operator to fine tune the Leveling and/or Compression balance and weighting. Leveling is a slow method of gain reduction. It maintains transient retention and wider dynamics. The Compression stage works faster and acts more aggressively on inherent dynamics. The key is by combining both modes, the processed output will be very consistent

A Rate (speed) toggle option is provided: Fast, suitable for speech/voice, or Slow, suitable for program material such as produced TV and/or Radio programs.

The device Output control normalizes the processed audio to 0VU.

Silence Gate: Aphex stresses – this is not an audio gate! It is a user defined threshold parameter. When the signal drops below the threshold for 1 sec. or longer, the Silence Gate freezes the VCA gain. This prevents the buildup of noise during pauses and/or extended passages of silence.

The device Limiter features a very fast attack and high threshold. It is designed to prevent occasional high transient activity and overshoots.

A Stereo Enhance mode is available on the 320A and 320D models. When activated it widens the stereo image. It’s effect is dependent upon the amount of applied compression.

Metering

The 320D Compellor features three, bi-color (red, green) LED metering modes: Input, Output, and Gain Reduction. For Input/Output metering – the red LED’s indicate VU/average. Green LED’s indicate peak level.

When the meter is set to display gain reduction (“GR”), the green LED’s indicate total gain reduction. Depending on the Process Balance control weighting – a floating red LED may appear within green LED instances. The floating red LED indicates Leveling gain reduction. If Leveling gain reduction is in fact occurring, the total gain reduction will be indicated by the subsequent green LED(s).

Below are 4 examples:

Example 1 displays Input or Output metering with an average (red) level of 0VU and a peak (green) level of +6dB. This translates to a +4dBu average level and a +10dB peak level (analog OL set to +4dBu).

Example 2 displays 4dB of Leveling Gain Reduction and 8dB of Total Gain Reduction.

Example 3 displays 12dB of Leveling Gain Reduction.

Example 4 displays 10dB of Compression Gain Reduction.

**Notice the position of the Process Balance control for examples 2, 3, and 4.

320D I/O

The 320D is essentially an analog processor utilizing standard XLR I/O jacks. The device also includes AES/EBU XLR jacks along with an internal DAC for digital I/O. The Input mode and/or Sample Rate is user selectable.

When implementing digital I/O – the Incoming audio is converted to analog as it passes through the device. The audio is then converted back to digital and output accordingly.

The digital input is calibrated internally and matches -20dBFS to 0VU on the Compellor’s meter. The +4dBu/-10dBV Operating Level options only affect the analog I/O.

Notes:

The Aphex Compellor is a long standing, highly regarded, and ubiquitous audio processor. It has been an integral multipurpose tool for me for 12+ years. My newly purchased (used) 320D is in near mint condition. In fact it looks and feels as if it was hardly used by the previous owner.

My system includes additional Aphex audio processors (651 Compressor, 109 EQ, 622 Expander/Gate, and a 720 Dominator II Multiband Peak Limiter). As well, a Mackie Onyx 1220i Mixer, Motu I/O, dbx 160A Compressor, dbx 286A Mic Processor, Marantz CF Recorder, and a Telos One Digital Hybrid. All components, with the exception of the 286A – are interfaced through a balanced Patchbay.

A typical processing/monitoring chain will pass system audio through the Compellor, followed by the 720 Peak Limiter. The processed audio is ultimately routed to the system’s Main Output(s). This chain optimizes playback of poorly produced Podcasts, VO’s, live streams, or videos. The routing is implemented via Patchbay.

A typical audio processing chain will route Pro Tools audio out via hardware insert (or bus, alternative output, etc.) through the Compellor (or a more complex chain) and returned in Pro Tools. In this scenario I use a set of assignable interface line inputs/outputs. The routing is implemented via Patchbay. I document the setup and use of hardware inserts here.

-paul.

Hardware Inserts In Your DAW

It is possible to implement support for use of external hardware processing components within your software DAW. This support is common in music recording and audio post production environments.

When properly implemented, operators have the capability to insert an instance of an external component (or chain) on a DAW audio track just like any other installed third party software plugin.

Besides potential tonal advantages, routing through a specialized external component can be less taxing on the host system’s resources.

Requirements

1 – Your Interface must have an available output (mono or stereo) for routing audio to an external component. You will also need an available input (again, mono or stereo) to accept the processed audio.

2 – Your DAW must support the routing.

Pro Tools and Logic Pro X

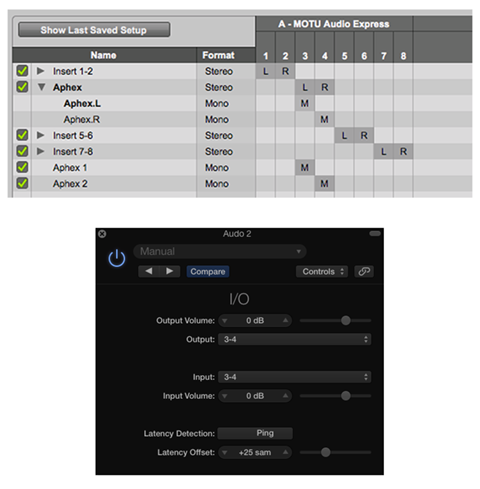
In the Pro Tools I/O settings you must define a set of available (and matching) Interface inputs and outputs for signal routing. In Logic Pro X, there is an I/O routing option plugin included in the Utility plugins group.

Have a look at the routing configuration options for both DAWS:

Inserts_small

The upper image displays a Pro Tools Insert Routing matrix. The default audio interface has a total of 8 inputs and outputs available as discrete I/O mono channels. They can remain as such. Alternatively, they can be paired to create four stereo signal paths.

I’ve defined three instances or parent paths of “Aphex” inserts using interface inputs and outputs 3 + 4. My processing chain supports a stereo signal flow or discrete dual mono.

The first Aphex instance is a stereo insert. Clicking the disclosure triangle reveals two associated mono channels that make up the stereo pair. This configuration translates in Pro Tools as a stereo hardware insert or as two discrete mono inserts.

At the bottom of the list I’ve also created two custom mono paths the will pass audio to discrete mono component channels. This alternative solution is unnecessary in this particular configuration. The stereo instance above provides the same level of flexibility with support for mono accessibility. Just be aware of the configuration flexibility.

The lower image displays a Logic Pro X stereo I/O instance as it would appear when inserted on any track. Notice how I am using the same combination of interface channels (3 + 4) to output the signal to external components, and to route the processed audio back into the DAW.

Use Case

Let’s say you are the proud owner of the very affordable and recommended dbx 266xs Dynamics Processor. You would like to use it to pre-process a discrete channel Skype session in realtime. This dbx Compressor, Limiter, and Gate can function as a dual mono processor. With routing properly configured, you can insert mono instances of the hardware processor on discrete tracks in your DAW session. Simply customize settings for each dbx channel and fire away.

266xs_small

My Chain

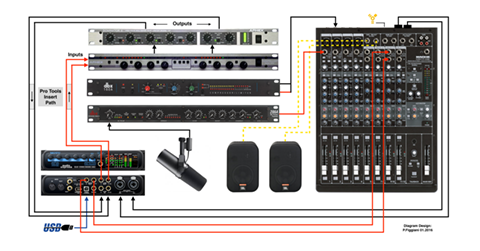
Over the years I’ve accumulated various analog audio processors by Telos, dbx, and Aphex. In the displayed diagram I disclose part of my current configuration with a few active components.

hardware_inserts-small

Before I get into the Pro Tools insert path configuration, let me explain the basic signal routing:

• I use a Mackie Onyx 1220i FW Mixer in combination with a Motu Audio Express USB/FW Interface. The Mackie controls a POTS line mix-minus using a Telos Digital Hybrid. The mixer also controls signal routing scenarios and recording on a Marantz CF Recorder. I use the mixer’s Control Room outputs to feed the inputs of a power amplifier to drive my JBL near-field monitors.

• The Motu’s Main Outputs are patched to the mixer. This audio is available on the Control Room outputs. I can easily switch back and forth between the mixer and the interface, designating one or the other as the default I/O.

• The mixer also functions as a secondary gain stage for the mic signal path. Notice how the mic is directly connected to the dbx 286A Voice Processor. It’s balanced line output feeds the channel 1 line input on the Mackie. The balanced Mackie Main Outputs are set to deliver a Mic Level signal. They feed the Mic Level inputs on the Motu interface. These inputs can be linked and routed to a single stereo DAW track. Alternatively I can designate the inputs to deliver discrete mono. This is handy when a second mic is integrated

• The dbx160a is a single channel (mono) compressor. It is connected to the Mackie’s channel 2 insert. I can use this device as a serial processor on mixer channel 2. I can also insert it on the channel that returns a telco caller’s POTS audio back to the mixer. In this scenario I can easily bypass it’s use on an insert and instead connect it in-line.

• All system connections are made with balanced XLR and TRS cables.

Not pictured: Aphex Expressor (mono) Compressor, Aphex 622 Expander/Gate, and Aphex two channel Parametric EQ.

Hardware Chain Insert

Let’s focus on the Pro Tools Insert path, instantiated on a stereo audio track:

The two (pictured) devices that I am currently using for external audio processing are by Aphex: 320a Compellor, and the 720 Dominator II. The 320a Compellor is widely used in radio broadcast facilities. This device can be configured to function as a Leveler, Compressor, or a mixture of both. A Process Balance setting controls the Leveling and Compression weighting. It supports stereo and dual mono processing. The current “D” version supports AES/EBU Digital I/O.

The Dominator II is a 3-band Peak Limiter with adjustable crossovers and zero overshoot. This device is also widely used in broadcast facilities and for live performances. The current 722 version features enhanced broadcast processing support, including Pre-Emphasis and De-Emphasis options.

With the Motu interface designated as the default I/0, it’s 3+4 Line Outputs route audio via insert from a Pro Tools audio track to the Compellor’s inputs. The Compellor’s outputs feed the Dominator II’s inputs. It’s outputs feed the Motu’s Line Inputs, routing the processed audio back to the DAW track where the hardware insert was originally instantiated.

A Skype session would be an obvious use option. In this case I would implement discrete mono hardware processing using two separate insert instances. In fact I can use this configuration when recording any audio source, or as a realtime processing option for output, playback, and streaming.

As far as playback, the Motu interface supports a Mix 1 Return option. In essence I can assign my system’s output into Pro Tools. With Input Monitoring activated, I can route the signal through the external processors and monitor the wet audio. This is a handy feature during playback of poorly produced programs.

Audition

Unfortunately Adobe Audition does not support hardware inserts. However there are various ways to integrate your external components in a multitrack session. For example you can assign a track’s output (or outputs) to an available interface output that feeds an external component’s input (or inputs). The processed audio is then routed to available interface inputs. By defining this active interface input as a track input, you essentially route processed audio back into the session.

This signal routing option will work in any DAW. Be aware you run the risk of initiating feedback loops!. To avoid this please make sure the software routing utility for the particular interface is properly configured.

In Conclusion

It is easy to integrate your analog gear in your software DAW. Use case scenarios are endless. Of course support and effectiveness will vary across all components and applications. I will say it’s a pretty cool feature, especially when software versions of coveted analog devices simply do not exist.

-paul.

dbx 286s: Beyond The Basics …

The dbx brand has been a favorite of mine since the late 1970’s. My first piece of dbx kit was a stand-alone noise reduction unit that I coupled with an old Teac Reel to Reel Tape Deck. Through the years I’ve owned various EQ’s and Dynamics processors, including the highly regarded 160A Compressor. I purchased mine in 2006.

160a-small

In January 2011 I was skimming through eBay listings looking for a dbx 286A Microphone Preamp Processor. At the time I had heard the original 286 model was co-designed by Bob Orban, and both models were widely used in Radio Broadcast facilities. I found it interesting that Radio Engineers would use a piece of gear that was not only cheap in terms of cost – but unconventional in terms of controls.

286A-small

One piece was available on eBay, supposedly used for 4 hours at a party in Hollywood Hills California, and then boxed for resale. The seller had a positive reputation, so I grabbed it for $115. Upon arrival it’s condition was as described, and it’s been in my rack ever since.

The 286/286A has evolved into the 286s, quite frankly an outright steal priced at $199. Due to it’s straight forward approach and affordable price, the Podcasting community has embraced it and often classifies it as “drool-worthy.” Pretty amusing.

286-small

In this article I am going to focus on the attributes of the Compressor stage and the De-Esser. I will demystify the DeEsser and discuss the importance of the Output (Gain) Compensation setting.

Unconventional

I mentioned the processor is unconventional. For example the Compressor’s Drive and Density settings essentially replace the Threshold, Ratio, Attack, and Release controls present on most Compressors.

The De-Esser requires a user defined High-Pass Frequency designation and Threshold setting to reduce excessive sibilance. Setup can be time consuming due to the lack of any visual representation of problematic energy in need of attenuation.

Compressor:Drive

Compression results depend on the level (and dynamics) of the incoming signal and corresponding settings. On a conventional compressor the Threshold monitors the incoming signal. When the signal surpasses the Threshold, processing engages and gain reduction is activated. The Ratio determines the amount of gain reduction. The Attack will affect how aggressively (or the speed at which) gain reduction initializes and ultimatly reaches maximum attenuation. The Release will control the speed of the transition from full attenuation – back to the original level

The Drive control on the 286s determines the amount of gain reduction (compression) applied to the incoming signal. Higher settings will increase the input signal level resulting in more aggressive compression (and noise).

How much gain reduction should you shoot for? Well that’s subjective. I would recommend experimenting with 6-12dB of gain reduction. Of course results will vary due to obvious variables (mic selection, preamp level, etc.)

Compressor:Density

When using a compressor to process spoken word, improper Release settings can result in choppiness, often referred to as pumping. The key is to have the gain reduction occurrences smoothly transition between instances of audible sound and natural pauses (silence).

The 286s uses a variable program dependent Release. In the event you feel (and hear) the necessity to speed up or slow down the program dependent Release – the Density control will come in handy.

Note the Density scale on the 286s is again somewhat unconventional. On a typical dynamics processor – setting the Release full counter-clockwise would result in a very fast Release. As the setting is adjusted clockwise, the Release duration is extended. The scale usually transitions from milliseconds to full seconds.

On the 286s, think of Density as a linear speed controller, where “1” (counter-clockwise) is slow and “10” (full clockwise) is fast.

For normal speech I recommend experimenting with the Density set between 3 and 5.

The De-Esser

If you check around you will notice a wide range of references regarding the frequency range where sibilance generally occurs. In reality there are many variables. Each instance of sibilance will need to be accurately identified and addressed accordingly.

The 286s De-Esser uses a variable high-pass filter. This instructs the processor where to initiate the attenuation of problematic energy. This Frequency control has a range of 800Hz-10kHz. The user manual states ” … settings between 4-8kHz will yield the best results for vocal processing.” This is good starting point. However proper setup requires time consuming arbitrary tweaking that may result in a low level of accuracy. A visual representation of the frequency range of the excessive sibilant energy will solve this problem. Once you identify the frequencies and/or range where most of the energy is present, setting the Frequency on the 286s will be demystified.

The De-Esser’s Threshold setting controls the amount of attenuation (sensitivity) and will remain constant as the input level changes.

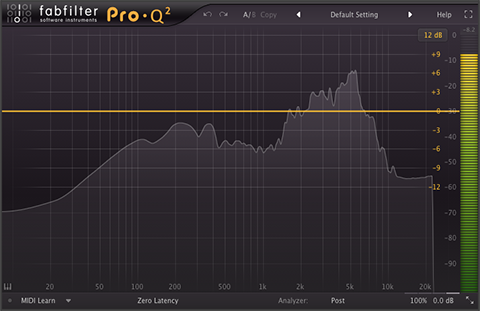
Have a look at the spectral analysis below:

sibilance-small

Notice the excessive energy in the 2-6kHz range (Frequency Range is represented on the X axis). For this particular segment of audio I would initially set the Frequency control on the 286s to 5kHz. Next I would adjust the Threshold until the sibilant energy is attenuated. I would then sweep the Frequency setting within the visual range of the sibilant energy and fine tune both settings until I achieve the most pleasing results. The key is not to over do it. Heavy attenuation will suppress vital energy and remove any hint of natural presence and sparkle.

To perform this analysis excersize – set the Threshold setting on the 286s to OFF. Pass the output of the processor to your DAW of choice and perform a real time spectral analysis of your voice using a software plugin the includes a Spectrum Analyzer. You can use any supported EQ plugin with it’s controls bypassed. You can also use something like the free (AU/VST) Span plugin by Voxengo (note that Span is CPU intensive).

Output Gain Compensation

Gain Compensation is an integral element of Audio Compression. It’s intent is to offset the gain reduction that occurs when audio is compressed. It is often referred to as Make-up Gain. When this gain offset is applied to compressed audio, the perceived, average level of the audio is increased. Excessive Make-up Gain can sometimes elevate noise that may have been previously inaudible at lower average levels.

Earlier I discussed how an elevated Drive control setting on the 286s will increase the input signal of low level source audio. In doing so you may initiate a suitable amount of compression. However you also run the risk of a noticeable increase in noise. In this particular scenario, try setting the Output Gain on the 286s to a negative value to offset the gain (and noise) that may have been introduced by the Drive setting.

Conclusion

I think it’s important to first learn the basics of Audio Compression from a conventional perspective. In doing so you will find it easier to get the most out of the unconventional controls on the dbx 286s, especially Drive and Density.

And let’s not forget that De-Essing is really nothing more than frequency band compression that will attenuate problematic energy. Establishing a visual reference to the energy will simplify the process of accurate correction.

-paul.

Podcasting System featuring the Allen & Heath XB-10 Console …

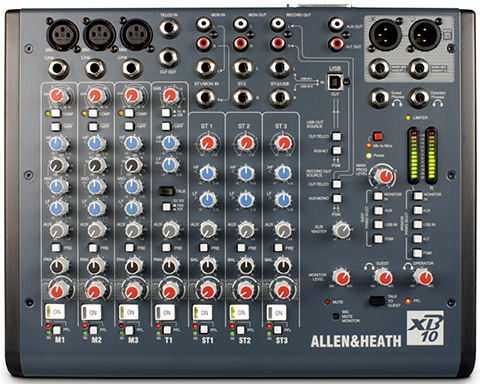
I continue to look around for a Broadcast Console that would be suitable to replace my trusty Mackie Onyx 1220i FW mixer. I was always aware of the XB-10 by Allen & Heath, although I did not pay much attention to it due to it’s use of pot-styled channel faders as opposed to sliding (long-throw) faders.

ah-mixer-480

Last evening I skimmed through the manual for the XB-10. Looking past the pot-styled fader issue this $799 console is packed with features that make it highly attractive. And it’s smaller than my Mackie, checking in at 13.2 inches wide x 10 inches deep. Allen & Heath also offers the XB-14-2 Console. It checks in at 15.2 inches wide x 18.3 inches deep with ample surface space for long-throw sliding faders. Bottom line is it’s larger than my Mackie and the size just doesn’t work for me.

XB-10: The Basics

Besides all the useful routing options, the XB-10 has a dedicated Mix-Minus channel that can be switched to receive the output of a Telephone Hybrid or the output of the bi-directional USB bus. In this case it would be easy to receive a Skype guest from a computer.

The console has latching On/Off switches on all input channels, supports pre-fader listening, and has built-in Compressors on channels 1-3. The manual states ” … the Compressor is optimized to reduce the dynamic range of the presenter microphone(s). Low signal levels are given a 10dB gain boost. Soft Knee compression activates at -20dBu, and higher level signals are limited.” Personally I would use a dedicated voice processor for the main presenter. However having the dynamics processing on-board is a useful feature, especially when adding additional presenters to the program mix.

The XB-10 is also equipped with an Output Limiter that can be used to ensure that the final mix does not exceed a predefined level. There is an activation switch located on the back panel of the device with a trim pot control to set the limiting threshold. If the Limiter is active and functioning, a front panel LED illuminates.

One other feature that is worth mentioning is the Remote Connector interface located on the back of the device. This can be used to implement CD player remote triggering, ON AIR light illumination, and external metering options.

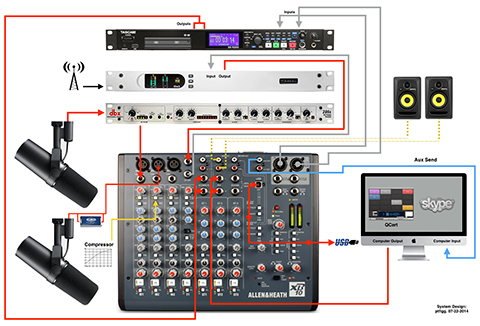
I decided to design a system using the XB-10 as the controller that is suitable for flexible Podcast Production and Recording. Bear in mind I don’t have any of these system components on hand except for older versions of the dbx Voice Processor and the Telos Phone Hybrid. I also have a rack-mounted Solid State Recorder by Marantz, similar to the Tascam. I’m confident that all displayed components would work well together yielding excellent results.

Also note there are many ways to integrate these components within the system in terms of connections and routing. This particular design is similar in concept to how I have my current system set up using the components that I currently own (Click to Enlarge).

AH-system-480

System Design Concepts and Selections

The mic of choice is the Shure SM7B. The was the first broadcast style mic that I bought back in 2004 and it’s one of my prized possessions. As far as I’m concerned it’s the most forgiving broadcast mic available, with one caveat – it requires a huge amount of clean gain to drive it. Common +60dB gain trims on audio mixers will not be suitable, especially when setting the gain near or at it’s highest level. This will with no doubt result in problematic noise.

In my current system I plug my dynamic mic(s) into my dbx 286a Voice Processor (mic input) and then route the processor’s line output to a line input on one of the Mic channels on my Mackie mixer. By doing so I pick up an additional +40dB of available gain to drive the mic. Of course this takes a bit of tweaking to get the right balance between the gain setting on the processor and the gain setting on the Mackie. The key is not to max out either of the gain stages.

I’ve recreated this chain in the new design using the updated dbx 286s. In doing so the primary presenter gets the voice processor on her channel. If there is the necessity to expand the system by introducing a second presenter, I’ve implemented the Cloudlifter CL-1 gain stage between the mic and the console’s mic input on channel 2. The CL-1 will provide up to +20dB of additional clean gain when using any passive microphone. Finally I point to the availability of the on-board dynamics processor and consider this perfectly suitable for a second presenter.

I mentioned the XB-10 has a dedicated telephone interface channel with a built in mix-minus. Once again I’ve selected the Hx1 Digital Telephone Hybrid by Telos Systems for use in this system. The telephone interface channel can be set to receive an incoming telephone caller or something like the Skype output coming in from a computer. I’ve taken this a step further by also implementing an analog Skype mix-minus using the Console’s Aux Send to feed the computer input. The computer output is routed back into the Console on an available channel(s).

As noted the USB interface on the Console is bi-directional. One use case scenario would be to use the computer USB output to send sound effects and audio assets into the program mix. (I am displaying QCart for Mac as a possible option).

The rest is pretty self explanatory. I’m using the Monitor output bus to feed the studio speakers. The Console’s Main outputs are routed to the Tascam recorder, and it’s outputs are routed to an available set of inputs on the Console.

Like I said I’m fairly confident this system design would be quite functional and well suited for flexible Podcast Production and Recording.

In closing beginning in 2004 besides designing sort of generic systems based on various levels of cost and complexity, it was common for an aspiring Podcast Producer to reach out to me and ask for technical assistance with the components they purchased. In this case I would build detailed diagrams for the producer much the same as the example included in this post. A visual representation of system routing and configuration is a great way to expidite setup when and if the producer who purchased the gear is overwhelmed.

Note:

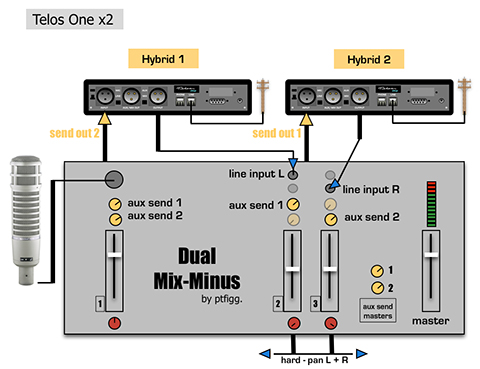
At one time I was providing a service where two individual participants were simultaneously calling into my studio for interview session recording. Since I had two dedicated phone lines and corresponding telephone hybrids, the participants were able two converse with each other using 2 Aux buses, in essence by creating two individual mix-minuses.

Here is the original diagram that I built in October 2006 that displays the routing of the callers via Aux sends:

dual-mm-480

Even though the XB-10 console contains a single Aux bus, a similar configuration may still be possible where an incoming caller from the telephone hybrid would be able to converse with a Skype guest, minus themselves. I need to read into this further before I am able to make a determination on whether this is supported.

Components:

[– Shure SM7B Broadcast Dynamic Microphone
[– Cloudlifter CL-1 Gain Stage
[– Allen & Heath XB-10 Broadcast Console
[– dbx 286s Voice Processor
[– Telos Hx1 Digital Telephone Hybrid
[– Tascam SS-R200 Solid State Recorder

Optional:

[– QCart for Mac OSX
[– KRK Rokit 5 Powered Studio Monitors

-paul.

Cutting Edge Podcasting System …

It’s been a while since I’ve been called upon to design an audio system suitable for Podcasting. In 2004 I built a site that focused on all aspects of Podcast Production. I will (reluctantly) disclose that I am the person who coined the term “Podcast Rig.”

Besides a prolific user forum and gear reviews, the site included systems that I designed at various levels of price and complexity. They are still viable some 10 years later. I eventually sold the rights to the property and content, and the site was unfortunately buried beneath The Podcast Academy, a site that published audio recorded at various conferences and events. These days I’m still actively involved in the space, handling audio post for a select group of clients.

I continue to get a good amount of use out of the gear that I bought to record my own podcast (2004-2006). For instance I still have my Electrovoice RE-20 mic on my boom, with a Shure SM7B and a Heil PR-40 stored in my closet. I’m still using a Mackie Mixer (Onyx 1220i), and my rack is full of analog processors including an Aphex Compellor, a dbx mono compressor, a dbx voice processor, and a Telos One Digital Phone Hybrid. Up top in the rack I have a Marantz Solid State Compact Flash Recorder. At the very bottom I’ve integrated an NAD Power Amplifier that drives my near field monitors.

And I continue to keep a very close eye on on what’s out there with regards to suitable gear for Podcasting Systems. In fact I have a clear idea of what I would buy TODAY if I decided to replace the components in my current system. And it’s not a cheap solution intended for novices. In fact this new system is quite expensive. Relatively speaking, for the approximate cost of a custom 6-Core MacPro Tube – this is my vision for a cutting edge professional Podcasting System that I am convinced would supply a ton of flexibility and output reference quality audio.

The Console

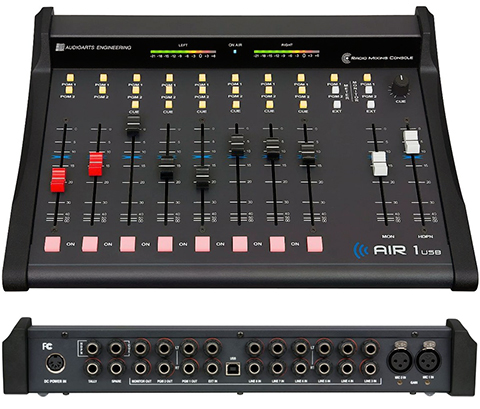
Notice I make reference to Console instead of Mixer? This is by design. For the brain of my system I’ve decided on the Air-1 USB Radio Console by Audioarts Engineering.
air_1-NEW

The Air-1 features two XLR Mic Inputs, six Balanced Stereo Input channels, USB I/O, two Program Buses, and a Cue Output. The active state of the input channels can be controlled by channel dependent On/Off push button switches. Routing to the Program Buses as well as the Cue Bus is also controlled by the use of push button switches that illuminate when active. The level of the Cue Bus is independently controlled by a dedicated pot. The console uses long-throw faders that are common on broadcast consoles, with independent faders for Monitor and Headphone outputs. By the way the Cue is a prefader Bus on the inputs that allows the operator to monitor off-air channels. It’s entirely separate from the main mix, or in this case – the Program Bus.

The USB I/O is bidirectional. It can be used to send and receive audio from a computer workstation for easy recording, playout, and automation system integration. There’s ample flexibility for Skype and easy setup for a telephone hybrid mix-minus. The device uses an external power supply that is included.

Note that many output options and routing configurations are customizable by way of Dipswitches located on the bottom of the chassis. Currently the AIR-1 retails for $1,789.00 at BSW.

The Processor

Since 2004 there have been a few audio processors that have been widely used by Podcast Producers. At first I recall the popularity of the affordable dbx 266XL (now discontinued) 2-channel Compressor Expander/Gate. Then there was the Aphex 230 Vocal Processor (also discontinued) that achieved early acceptance due to excellent marketing by Aphex and their recognition of Podcasting as a viable option for broadcasters to widen their reach. The device eventually attracted the interest of Podcast Producers who were willing to shell out upwards of $700 for this great sounding piece of gear.

These days (and much to my surprise) there is a fairly inexpensive Compressor/Limiter/Gate by Behringer that has steadily gained popularity in the space. From what I can tell this is due to a few prolific “Podcast Consultants” using the processor and recommending/selling it for whatever reason. Personally I was never a fan of the brand. But that’s just me.

For this new high end system I am selecting the Wheatstone/Vorsis M-1 Digital Mic Processor.

m-1

The processor uses sophisticated digital audio processing algorithms throughout it’s internal chain. On the back of the unit there is one AES digital output, one Mic input, and a single analog (XLR) output that can be set to pass Mic or Line Level signal. This is important in the design of this Podcasting System due to the way in which it would connect to the Air-1 Console. In essence the Mic would get connected to the processor input and the analog output switched to Mic Level would feed one of the dedicated Mic channels on the Console. There is also a Dipswitch matrix located on the back of the device that allows the operator to customize a few options and functions.

The M-1 supports variable Sample Rates, has switchable Phantom Power, Hi-Pass/Low-Pass filters, a De-Esser, Compressor, and Expander. There are independent Input and Output Gain pots and a Level Meter that can be switched to monitor Input or Output. There is also a De-Correlator function, also referred to as a Phase Rotator that will tweak waveform symmetry.

Also included is dual Parametric EQ with user defined frequencies, cut/boost control, and variable Q. In addition there are two independent Shelving filters that can be used to shape the overall frequency response of the signal. The EQ stage can be placed before or after the Compressor in the processing chain.

But that’s not all. The M-1 can be controlled and customized locally or remotely via Windows GUI software running on a PC. Note that although this feature is intriguing, it would be of no use to me based on my dependency to the Mac platform. In fact from what I can tell there may be some Windows operating system incompatibilities with the bundled software. This may very well cause difficulties running the Windows software on a Mac in an emulated environment. I’ll need to check into it. But like I said, with no native support for the Mac I would probably need to pass. Currently the M-1 Processor retails for $799.00 at BSW.

The Mic

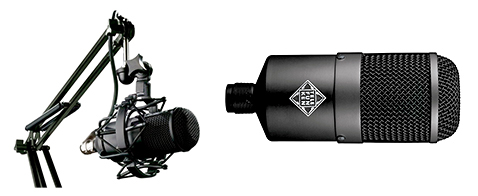
At this point it would make very little sense to even consider purchasing yet another microphone based on my current lot (EV RE-20, Shure SM7B, and Heil PR-40). But I figured what the heck – why not explore and try something new? Note that I’ve never tested the following mic. So I’m shamelessly speculating that I would even like it!. What drew me to this mic was the reputation of the manufacturer and the stellar package deal that is currently available. The mic is the Telefunken M82 Broadcast.
mic

The M82 is an end-address, large diaphragm (35mm capsule) cardioid dynamic mic (Frequency Range 25Hz – 18kHz). What’s interesting is this mic is designed to be used as a kick-drum mic, yet it is well suited for broadcast voice applications. In fact if I recall the timeless EV-RE20 was also originally designed to be used as a kick-drum mic before it was widely embraced by radio and voice professionals.

Anyway the Telefunken supplies two separate EQ Switches:Kick EQ and High Boost. The Kick EQ engages a lower mid-range cut at around 350Hz. The High Boost shifts upper mid-range and high frequencies starting around 2kHz with a 6dB boost by 10kHz. Any combination of the two switches can be used to tailor the response of the mic.

Here is what really caught my attention – the mic is available in a Broadcast Package that includes the M786 Broadcast Boom with built in XLR cable, the M700 Shock Mount, and a protective case. Currently the M82 Broadcast Package retails for $499.00 at BSW.

The Hybrid

As far as I’m concerned any serious Podcast Producer who intends to incorporate remote guests needs to implement an easy alternative to the now ubiquitous Skype. A Digital Telephone Hybrid is the obvious choice, allowing program guests to call into the host system using a standard telephone line. With proper configuration of a mix-minus by the host, seamless communication can be achieved.

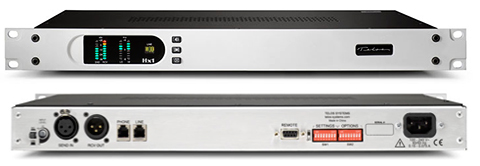
Sometime around 2010-2011, Telos Systems replaced the ubiquitous Telos One with the brand new Hx1 Hybrid. I’ve chosen this device for my system.
hybrid

The Hx1 receives an analog “POTS” (Plain Old Telephone Service) line signal and implements digital conversion resulting in excellent audio quality. This Hybrid features automatic gain control in both directions, a ducking system, feedback reduction, and a digital dynamic EQ. The device is also capable of Auto-Answer functions for unattended operation.

Using the Program 2 Bus on the Air-1 Console to feed the Hx1 input, setting up a broadcast mix-minus would be a snap. In my current system I’ve placed a single channel dbx dynamics compressor between the output of my Telos One and the input used on my Mackie Board. This works pretty well. I’d need to test this setup with the Hx1 to determine whether the compressor would even be necessary. Currently the Telos Hx1 Digital Hybrid retails for $695.00 at BSW.

The Recorder

I’ll be frank:In a studio environment I’m not a fan of using a small, handheld digital recorder. I’m aware of what’s being recommended by the experts, mainly models by Edirol and Roland. Of course these devices are perfectly capable and well suited for remote recording, ENG, and video production. I prefer a dedicated rack mounted component, just like the Marantz PMD-570 currently living in my rack.

The Marantz piece that I own has an interesting feature: Besides PCM and MP3 recording, the unit can record directly to MP2 (MPEG-1, Layer II) on the fly. This is the file format that I use to exchange large files with clients. Basically the clients will convert lossless files (WAV, AIFF) to MP2 prior to uploading to my FTP server. In doing so the file is reduced in size by approximately 70%. The key is when I take delivery and decode … most, if not all of the audible fidelity is retained. Needless to say MP2 is a viable intermediate file format and it is still used today in professional broadcast workflows.

Again it’s time for something new. For this Podcasting System I’m going with the Tascam SS-R200 Solid State Recorder.

recorder

The SS-R200 will accept Compact Flash and SD/SDHC Memory cards as well as USB Flash Drives. The device will also accept a USB keyboard that can be used for metadata editing. Supported file formats are WAV and MP3 @ 44.1/48kHz. I/O is flexible and includes XLR balanced input/output, RCA unbalanced, and coaxial S/PDIF digital. There are additional I/O support options for RS-232C and Parallel Control for external device interfacing. The display is clear, and the transport buttons are large and easily accessible.

One slight issue with the recorder – I don’t believe you can connect it directly to a computer via USB (My Marantz supports this). Of course the work around is to use USB Flash drives for recording. Compact Flash and SD/SDHC recording will require an additional device for computer interfacing. Currently the Tascam SS-R200 recorder retails for $549.00 at BSW.

The Cost

Time to tally up:

Audioarts Air-1 Console: $1,789.00
Wheatstone M-1 Processor: $799.00
Telefunken M82 Mic Kit: $499.00
Telos Hx1 Hybrid: $695.00
Tascam CF Recorder: $549.00

Total: $4,331.00 (not including applicable tax and shipping)

There you have it. Like I said this is far from a budget solution. And surely I’m not suggesting that you need to spend this kind of cash to record Podcasts. However for the serious producer with appropriate technical skills and a revenue stream, this is not unattainable. As far as me personally – at this time this system is not in my immediate plans. But you never know. I’ve always wanted to replace my mixer with a Broadcast Console, so contemplation will continue …

Notes

I’ve purposely refrained from recommending accessories including cables and headphones. And regarding headphones, after years of wearing them for hours upon hours, I’ve moved over to a moderately priced set of Shure SE215 Earphones.

Full sized headphones can be very uncomfortable when worn for extended periods of time, hence my decision. Believe me it was a major adjustment. These Shure’s are not considered a high-end option. However they do serve the purpose. Isolation is good and sound quality is perfectly suitable for dialogue editing. And I’m much more comfortable wearing them. I still use my Beyer Dynamics, AKG’s, and Sony’s for critical monitoring when necessary.

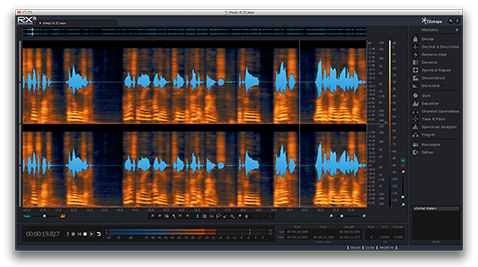
And I’ve also refrained from recommending software solutions like DAWS and plugins. This would be the source of yet another installment. However I will make one recommendation. If you are serious about high quality sound and often deal with problematic audio, you need to seriously consider RX3 Advanced by iZotope.
rx3

In my work this package is simply indispensable. I’m not going to get into the specifics. I will say that the Broadband DeNoiser, the Dialog Denoise Module, and the Dereverb features are simply spectacular. Indeed it’s an expensive package. I’m grateful that I have it, and it’s highly recommended.

And lastly, storage. Since all components are rack-mountable, the obvious solution would be a 4U enclosure by Middle Atlantic or Raxxess. I would also suggest a 1 Space Vent Panel installed between the Processor and the Hybrid. And if it’s convenient the Console can be placed on top of the enclosure due to it’s relatively small footprint.

One final note:I have no formal affiliation with BSW. I simply pointed to their listings due to price and availability.

-paul.

Broadcast upTimer …

This is the updated version of a neat utility that I built about 5 years ago. Radio Stations sometime use what are referred to as upTimers to track live programs and air time. Hardware versions are available from main stream broadcast gear suppliers and can be quite expensive. In fact many of these devices can be remotely controlled using a console link. I thought a software version would be cool, so there you have it.

New options include the capability to set the timer Ceiling (60 or 90 minutes), HUD window interface, and date display. I decided to use a HUD window instead of a basic textured window. Clicking away from the running timer window does not affect clear visibility. The physical size of the window is now 840 x 365 pixels. This makes it easy to see from a distance.

I need to add the Sparkle Framework for automatic updating support before I release it …

-paul.

Update:

I replaced the current date with a Running Time display. Sparkle has been added as well …

You can download upTimer 2.0 here.