Final Cut Pro Offline Edit with ProRes Proxy…

It has been documented that the newly released feature film “Eat Pray Love” staring Julia Roberts was edited entirely on a Final Cut Pro workstation.

I found this most interesting:

“The editors found an efficient solution in ProRes 422 (Proxy), a new version of the Apple ProRes codec introduced with Final Cut Pro 7. As soon as dailies arrived from EFILM, Assistant Editor Doc Crotzer would transcode the files from ProRes 422 (HQ) to ProRes 422 (Proxy), organize the footage into bins, and prepare the material for editing.”


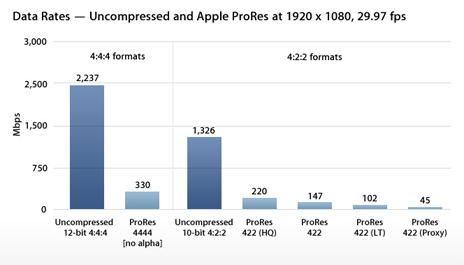
Review this chart, and notice the variations in data rates of the ProRes family of codecs:


Obviously lower data rates = smaller file sizes. The bottom line is working with ProRes Proxy files (Offline copies of original ProRes 422/HQ files) creates a much more efficient workflow that is less taxing on any system.

I’ve adopted a slick method using my iMac for rough cutting ingested AVCHD footage that has been transcoded to ProRes Proxy via Final Cut Pro’s Log and Transfer. Depending on the complexity of the finished project sequence, I can finish and output on the iMac, or – move the project and it’s assets over to my MacPro for finishing. The key is prior to outputting, the edited Proxy clips can be re-captured and replaced with higher quality ProRes versions.


The Workflow:

  • Set up the FCP Project and Sequence. My sequences are typically 1080p/24.
  • Add a new Bin in the FCP Browser and designate it as the Logging Bin.
  • Mount media and run Log and Transfer. From the Import Preferences Action Popup menu, set ProRes Proxy as the ingest transcode format.
  • Log and Transfer clips into the project. Before closing Log and Transfer, reset the ingest transcode format to ProRes 422.
  • Close Log and Transfer and edit clips into sequence.

  • Reconnect Media

  • Select the project sequence in the Browser. From the FCP menu, run Media Manager: File/Media Manager. Create an Offline Sequence and set to ProRes 422.


  • Name and save the new Sequence. A new tab will appear in the FCP Browser that includes the duplicate sequence and it’s offline clips.
  • Select the new sequence. From the FCP Menu: File/Batch Capture.
  • Choose All Offline Items in Selection from the displayed Re-Import popup menu. Log and Transfer will run and recapture the sequence clips as ProRes 422 versions.
  • Finish and output.
  • If you edit on an iMac, a Mac Portable with an external FW800 hard drive, or if you are looking for a more efficient large-scale project workflow – try this method. It works well for me …

    -ptfigg.
    Panasonic AG-HMC150 AVCCAM

    hmc-150-for_blog.tiff As noted I purchased a Canon HF-S100 camcorder and returned it immediately. In fact the camera was repackaged and shipped back to B&H on the same day it was delivered. Besides my careless research (see the previous post), the camera felt like a $1K toy. B&H provided a full refund.

    I moved forward and purchased the solid state Panasonic AG-HMC150 (AVCHD) Hi Definition AVCCAM. The camera is in short supply due to it’s enormous popularity. It debuted at NAB 2008 and hit the street in October. After a few months in circulation shooters embraced it and the rest is history.

    SDHC_for_blog.jpeg

    The camera records to inexpensive SDHC memory cards. Footage is easily ingested into Final Cut Pro using the Log and Transfer mode. Due to the high efficiency of the AVCHD format you can record approximately 100 minutes of the highest quality (1080/24p) video on a 16 gig card that sells for about 70 bucks. AVCHD is essentially high definition H.264 (MPEG-4) video. The tapeless workflow is a major plus.

    Additional features worth noting:

    • 28 mm Wide Angle lens

    • Full manual control. Large manual focusing ring with focus assist

    • Recording Formats: PH (high quality) mode: 1080/60i, 1080/30p (over 60i), 1080/24p (native), 720/60p, 720/30p (over 60p) and 720/24p (native). Lower quality settings are limited to 1080/60i.

    • Waveform monitor for accurate exposure control

    • Dual XLR audio inputs (mic or line) with 48v phantom power

    • Extensive support for operational presets. Panasonic refers to presets as “Scene Files.” The default scene files can be edited/backed up and saved on to the camera’s SDHC card and transfered to a computer for future use (the files are standard .txt files).

    • A host of professional picture control and operational settings

    Let me also mention that iMovie ’09 supports AVCHD video with one caveat relative to this camera: no support for 24p footage. You’re limited to 30p (29.97 fps). The full 1920×1080 resolution is supported.

    A few minor issues:

    For serious extended shooting the stock battery is insufficient. The optional 3 hr. battery runs about $150.00. The on-board stereo mic is of low quality. Not a surprise. A logical choice is the Audio Technica AT875R ($199.00).

    So far the camera is impressive. I’ll be posting additional information about the camera in the coming weeks …

    -paul.

    Technorati Tags:
    , ,