I continue to look around for a Broadcast Console that would be suitable to replace my trusty Mackie Onyx 1220i FW mixer. I was always aware of the XB-10 by Allen & Heath, although I did not pay much attention to it due to it’s use of pot-styled channel faders as opposed to sliding (long-throw) faders.
Last evening I skimmed through the manual for the XB-10. Looking past the pot-styled fader issue this $799 console is packed with features that make it highly attractive. And it’s smaller than my Mackie, checking in at 13.2 inches wide x 10 inches deep. Allen & Heath also offers the XB-14-2 Console. It checks in at 15.2 inches wide x 18.3 inches deep with ample surface space for long-throw sliding faders. Bottom line is it’s larger than my Mackie and the size just doesn’t work for me.
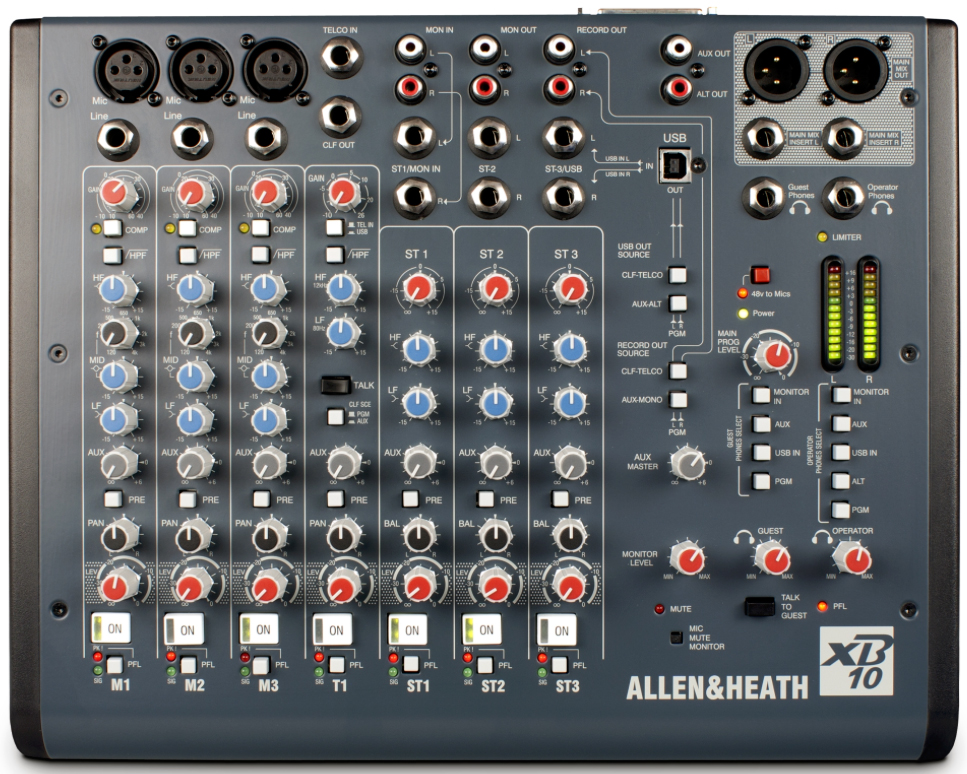
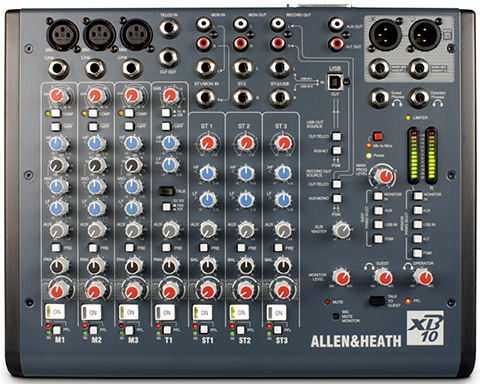
XB-10: The Basics
Besides all the useful routing options, the XB-10 has a dedicated Mix-Minus channel that can be switched to receive the output of a Telephone Hybrid or the output of the bi-directional USB bus. In this case it would be easy to receive a Skype guest from a computer.
The console has latching On/Off switches on all input channels, supports pre-fader listening, and has built-in Compressors on channels 1-3. The manual states ” … the Compressor is optimized to reduce the dynamic range of the presenter microphone(s). Low signal levels are given a 10dB gain boost. Soft Knee compression activates at -20dBu, and higher level signals are limited.” Personally I would use a dedicated voice processor for the main presenter. However having the dynamics processing on-board is a useful feature, especially when adding additional presenters to the program mix.
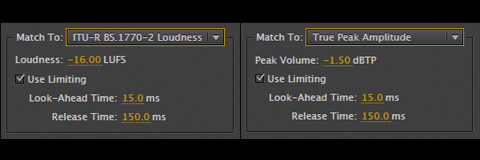
The XB-10 is also equipped with an Output Limiter that can be used to ensure that the final mix does not exceed a predefined level. There is an activation switch located on the back panel of the device with a trim pot control to set the limiting threshold. If the Limiter is active and functioning, a front panel LED illuminates.
One other feature that is worth mentioning is the Remote Connector interface located on the back of the device. This can be used to implement CD player remote triggering, ON AIR light illumination, and external metering options.
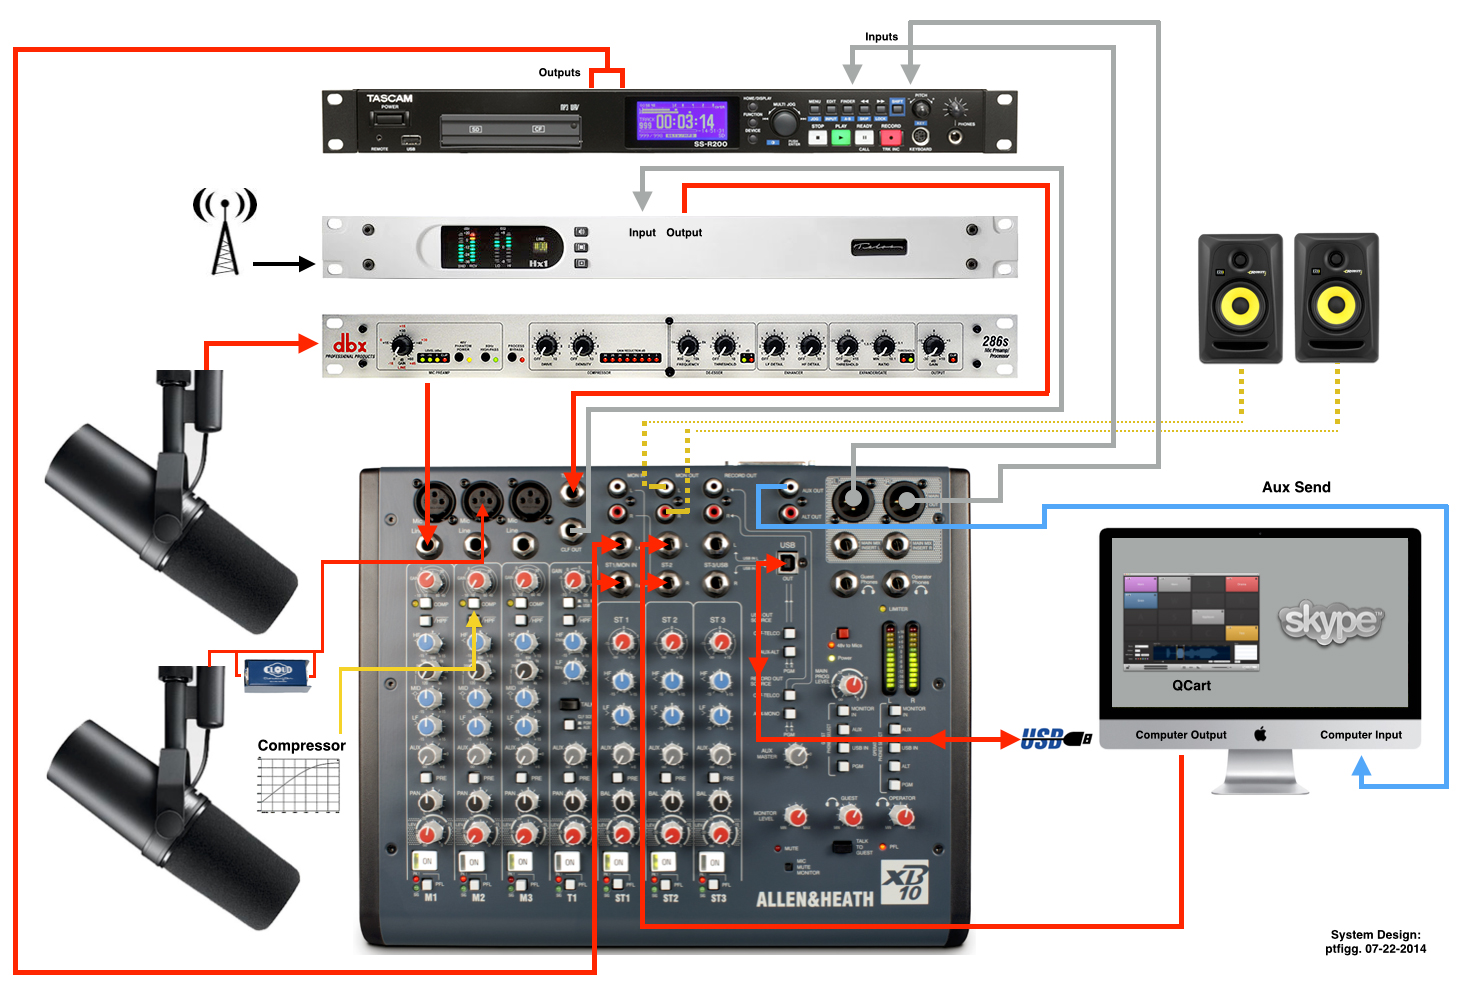
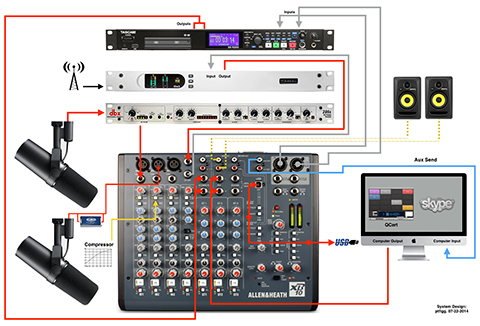
I decided to design a system using the XB-10 as the controller that is suitable for flexible Podcast Production and Recording. Bear in mind I don’t have any of these system components on hand except for older versions of the dbx Voice Processor and the Telos Phone Hybrid. I also have a rack-mounted Solid State Recorder by Marantz, similar to the Tascam. I’m confident that all displayed components would work well together yielding excellent results.
Also note there are many ways to integrate these components within the system in terms of connections and routing. This particular design is similar in concept to how I have my current system set up using the components that I currently own (Click to Enlarge).
System Design Concepts and Selections
The mic of choice is the Shure SM7B. The was the first broadcast style mic that I bought back in 2004 and it’s one of my prized possessions. As far as I’m concerned it’s the most forgiving broadcast mic available, with one caveat – it requires a huge amount of clean gain to drive it. Common +60dB gain trims on audio mixers will not be suitable, especially when setting the gain near or at it’s highest level. This will with no doubt result in problematic noise.
In my current system I plug my dynamic mic(s) into my dbx 286a Voice Processor (mic input) and then route the processor’s line output to a line input on one of the Mic channels on my Mackie mixer. By doing so I pick up an additional +40dB of available gain to drive the mic. Of course this takes a bit of tweaking to get the right balance between the gain setting on the processor and the gain setting on the Mackie. The key is not to max out either of the gain stages.
I’ve recreated this chain in the new design using the updated dbx 286s. In doing so the primary presenter gets the voice processor on her channel. If there is the necessity to expand the system by introducing a second presenter, I’ve implemented the Cloudlifter CL-1 gain stage between the mic and the console’s mic input on channel 2. The CL-1 will provide up to +20dB of additional clean gain when using any passive microphone. Finally I point to the availability of the on-board dynamics processor and consider this perfectly suitable for a second presenter.
I mentioned the XB-10 has a dedicated telephone interface channel with a built in mix-minus. Once again I’ve selected the Hx1 Digital Telephone Hybrid by Telos Systems for use in this system. The telephone interface channel can be set to receive an incoming telephone caller or something like the Skype output coming in from a computer. I’ve taken this a step further by also implementing an analog Skype mix-minus using the Console’s Aux Send to feed the computer input. The computer output is routed back into the Console on an available channel(s).
As noted the USB interface on the Console is bi-directional. One use case scenario would be to use the computer USB output to send sound effects and audio assets into the program mix. (I am displaying QCart for Mac as a possible option).
The rest is pretty self explanatory. I’m using the Monitor output bus to feed the studio speakers. The Console’s Main outputs are routed to the Tascam recorder, and it’s outputs are routed to an available set of inputs on the Console.
Like I said I’m fairly confident this system design would be quite functional and well suited for flexible Podcast Production and Recording.
In closing beginning in 2004 besides designing sort of generic systems based on various levels of cost and complexity, it was common for an aspiring Podcast Producer to reach out to me and ask for technical assistance with the components they purchased. In this case I would build detailed diagrams for the producer much the same as the example included in this post. A visual representation of system routing and configuration is a great way to expidite setup when and if the producer who purchased the gear is overwhelmed.
Note:
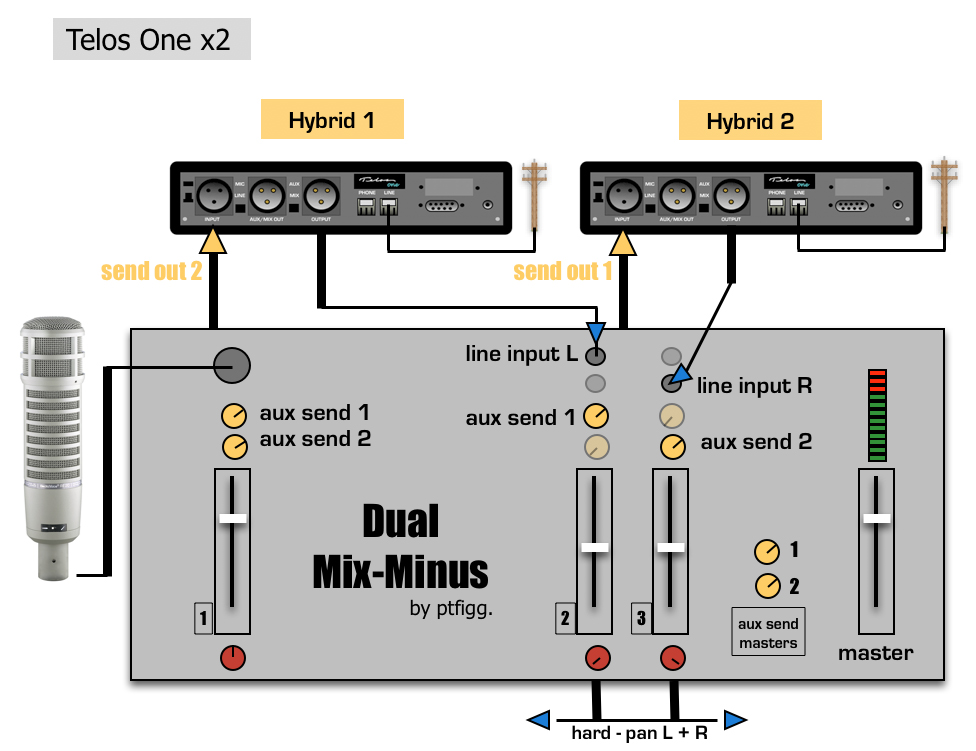
At one time I was providing a service where two individual participants were simultaneously calling into my studio for interview session recording. Since I had two dedicated phone lines and corresponding telephone hybrids, the participants were able two converse with each other using 2 Aux buses, in essence by creating two individual mix-minuses.
Here is the original diagram that I built in October 2006 that displays the routing of the callers via Aux sends:

Even though the XB-10 console contains a single Aux bus, a similar configuration may still be possible where an incoming caller from the telephone hybrid would be able to converse with a Skype guest, minus themselves. I need to read into this further before I am able to make a determination on whether this is supported.
Components:
[– Shure SM7B Broadcast Dynamic Microphone
[– Cloudlifter CL-1 Gain Stage
[– Allen & Heath XB-10 Broadcast Console
[– dbx 286s Voice Processor
[– Telos Hx1 Digital Telephone Hybrid
[– Tascam SS-R200 Solid State Recorder
Optional:
[– QCart for Mac OSX
[– KRK Rokit 5 Powered Studio Monitors
-paul.